> For the complete documentation index, see [llms.txt](https://knowledge.carbon.show/llms.txt). Markdown versions of documentation pages are available by appending `.md` to page URLs; this page is available as [Markdown](https://knowledge.carbon.show/carbon-for-unreal/menus-panels-and-tools/tools/dmx-recorder.md).
# DMX Recorder
## Introduction
The DMX Recorder Tool consists of two sections:
* Selection Status
* Disable Live Sim
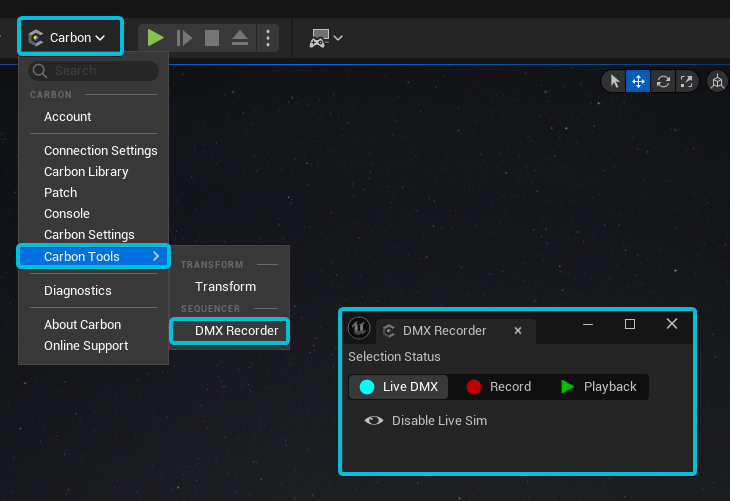
#### Selection Status
**Live DMX:** Allows the selected fixtures to be controlled by live DMX connections, and ensures the fixtures are disarmed for recording. Selecting Live DMX will also remove the selected fixtures from the Take Recorder.
**Record:** Arms the selected fixtures for Take Recorder. Clicking Record will also open the Take Recorder and Sequencer panels if not already open in the editor.
**Playback**: Preps the selected fixtures to be played back using data from the Sequencer. Fixtures that are armed for playback will not be driven by DMX connections. Disarms the fixtures for recording.
#### Disable Live Sim
Disables simulation of all GenericDMX fixtures in the scene to improve performance during recording. It is most effective in scenes with a high performance cost.
## Workflow
The UE5 Take Recorder is the recommended workflow for recording Carbon fixtures to an Sequence. Take Recorder is automatically enabled whenever Carbon is installed in a project.
{% hint style="info" %}
**Take Recorder overview:**\
{% endhint %}
{% hint style="info" %}
**UE5 Sequencer overview:**\
{% endhint %}
Carbon for Unreal includes the DMX Recorder which makes the process of selecting fixtures in the scene, arming for record, and playing back a take simple.
The tool can be opened by clicking **DMX Recorder** on the Carbon Tools tab of the Carbon Menu.
When you launch the DMX Recorder, both the **Take Recorder** and **Sequencer** panels will open automatically.
### **Arming Fixtures for Record**
Select all the fixtures you would like to record in the level outliner or through the [Patch View.](/carbon-for-unreal/menus-panels-and-tools/panels/patch.md)\
\
\&#xNAN;*(You can use the **Select All** button in the Patch View to select all fixtures in scene.)*
{% hint style="info" %}
**Tip:** The record mode status of fixtures is visible in the **Patch View**.
{% endhint %}
Open the DMX Recorder and toggle all selected fixtures to “Record” mode. \
\
\&#xNAN;*(For some additional performance headroom when recording, use the **Disable Live Sim** option.)*
Add the **Carbon Multi Fixture Scene Recorder** to the Take Recorder.\
\
The high performance **Carbon Scene Recorder** will auto detect all armed fixtures in the scene and record onto a single sequence
Additionally, you can add in a CineCameraActor into the Take Recorder. *(This step can also be done when editing the sequence later.)*
### **Recording a Sequence**
Ensure that the Carbon Scene Recorder is reading the correct number of fixtures in the Take Recorder. (*It is also recommended to name the Slate before starting a Take.*)\
**Prior to recording, you must be in either Play in Editor or Simulate modes.**
Press the **red record button** in the Take Recorder to begin recording a take. Recording will begin after a three second countdown.
Drive the fixtures from your console.
When you've finished recording your sequence, click the stop button in the Take Recorder and exit play/simulate mode.
### **Playback a Recorded Sequence**
Arm fixtures for playback by selecting Yes in the bottom-right prompt that appears after ending a recording, or by using the DMX Recorder panel.
Open your recorded sequence using the **Review the last recording** button in the Take Recorder. (*You can also open a sequence within the Take Browser.)*
Once in play/simulate mode, use the sequence controls to playback your recorded take.
If you are not happy with the current take, simply set the recording mode to **Record** in the DMX Recorder panel and record a new take.
## Recording in Real-time
To record directly from the Unreal viewport, and save to disk in real-time, you can use the Off World Live Livestreaming Toolkit plugin. Follow these tutorials to learn more:
* [Off World Live - Media Output](https://knowledge.offworld.live/en/owl-toolkit-quick-guides/owl-media-output)
* [Youtube - How to live-stream direct from Unreal Engine to RTMP, RTSP, SRT or live-record to MP4,MOV,AVI,MKV](https://youtu.be/wOENhUKJRuU)
---
# Agent Instructions
This documentation is published with GitBook. GitBook is the documentation platform designed so that both humans and AI agents can read, navigate, and reason over technical content effectively. Learn more at gitbook.com.
## Querying This Documentation
If you need additional information that is not directly available in this page, you can query the documentation dynamically by asking a question.
Perform an HTTP GET request on the current page URL with the `ask` query parameter:
```
GET https://knowledge.carbon.show/carbon-for-unreal/menus-panels-and-tools/tools/dmx-recorder.md?ask=
```
The question should be specific, self-contained, and written in natural language.
The response will contain a direct answer to the question and relevant excerpts and sources from the documentation.
Use this mechanism when the answer is not explicitly present in the current page, you need clarification or additional context, or you want to retrieve related documentation sections.