# Welcome to Carbon

Carbon comes in two forms, built for different ways of working. While they share the same core ideas, the experiences are intentionally different.

Choose the path that best fits how you want to work.

{% columns %}
{% column %}
**Carbon (Standalone)**

* Easy to learn, game-like experience
* Collaboration built in
* Minimal setup, fast iteration
  {% endcolumn %}

{% column %}
**Carbon for Unreal Plugin**

* Runs inside Unreal Engine
* Highly flexible and customizable
* Ideal for advanced pipelines
  {% endcolumn %}
  {% endcolumns %}

<table data-card-size="large" data-view="cards"><thead><tr><th></th><th></th><th data-hidden data-card-cover data-type="files"></th><th data-hidden></th><th data-hidden data-card-target data-type="content-ref"></th></tr></thead><tbody><tr><td>Carbon Standalone</td><td></td><td></td><td></td><td><a href="/pages/F4nrOrI0JE9huzt9ZlJ9">/pages/F4nrOrI0JE9huzt9ZlJ9</a></td></tr><tr><td>Carbon for Unreal Plugin</td><td></td><td></td><td></td><td><a href="/pages/Fu0yoi9Hzj1rmbki3cpS">/pages/Fu0yoi9Hzj1rmbki3cpS</a></td></tr></tbody></table>


# TLDR - The Manual We Hope You Don’t Need

## If Carbon needs a manual, we missed something

Carbon Standalone is designed to feel less like traditional software and more like a **real-time creative environment**—something you explore, experiment with, and learn by doing.

In other words: **it’s closer to a game than a manual-driven tool.**

Think about the last great game you played.\
You probably didn’t open a 40-page PDF before you started. You clicked, moved, tried things, made mistakes, and figured it out. Carbon is built with that same philosophy.

If you *need* a detailed step-by-step guide just to get moving, that’s not a documentation problem—that’s a **UX problem**. And we want to know about it.

***

### Why There Isn’t a Full Manual (Yet)

Carbon Standalone is still early—and that’s intentional.

For the **Founder’s Edition**, our goal isn’t just to ship features. It’s to learn:

* What feels intuitive immediately
* What requires explanation
* Where the interface breaks your flow
* Where you stop and think, *“Wait… how does this work?”*

If we wrote a comprehensive manual right now, we’d risk:

* Explaining around design problems instead of fixing them
* Training users to work *against* the interface
* Missing opportunities to make Carbon fundamentally better

Instead, we’re letting the product speak first.

***

### When You Get Stuck — That’s Valuable

If you find yourself:

* Unsure what a tool does
* Wondering where a feature lives
* Guessing instead of knowing
* Watching a tutorial just to understand a basic action

That’s exactly the feedback we want.

Those moments are signals. They tell us where Carbon isn’t living up to its promise of being intuitive, playful, and fast.

***

### Help Us Find the Shortfalls

We invite all Founder’s Edition users to tell us:

* What felt confusing
* What wasn’t where you expected it to be
* What required trial-and-error when it shouldn’t have
* What you had to “learn” instead of just *doing*

👉 **Submit your feedback using this form:**\
*(link to feedback form)*

Even small friction points matter. Especially the small ones.

***

### What Comes Next

This isn’t us saying “there will never be documentation.”

As Carbon matures, we *will* create:

* Clear reference material
* Advanced workflow guides
* Deep-dive technical documentation

But those documents should explain **power**, not compensate for confusion.

Right now, this phase is about shaping Carbon into something that doesn’t *need* a manual to feel natural.

Thanks for helping us build it that way.


# Roadmap

### Learn more about exciting new features in development <a href="#hs_cos_wrapper_kb-article-module-4" id="hs_cos_wrapper_kb-article-module-4"></a>

View the latest roadmap [here](https://roadmap.carbon.show/)


# Release Notes

## v0.9.7

General

* The app now asks for confirmation for all close actions, not just the close button.
* You can now use “Enter” to submit most of the modal promps (or “Escape” to cancel)
* Improved Main Menu look
* \[Fixed]\[Windows] the file picker is now capturing the main window correctly
* Most widgets now show the number of selected items (if applicable)

Gizmo

Fully reworked the gizmo

* Added a visual indicator for tracking gizmo transform edits on objects.
* The gizmo is now visible trough objects
* \[Fixed] Alt+Drag now correctly selects the duplicated object

Project

* Added Auto Save (check Project Settings)
* Added Save Copy, which will save a copy of the current project without switching to it
* “Save As” and “Save Copy” text input now receives focus on open
* “Save As” and “Save Copy” now have the current project name in the text field
* “Save As” and “Save Copy” now check for existing project names
* \[Fixed] Save As now correctly only saves the assets to the new project
* \[Fixed] Copy pasted project folders can now be openned and show their proper path

Objects

* A duplicated object will now have the postfix “Copy”
* When deleting a group, added a prompt to ask if childs should be also deleted

Groups

* The pivot handle is now correctly computed at the center of the group
* \[Fixed] The group visual box is now correctly rotated

Viewport

* Improved Viewport Layout and added split buttons for options
* Removed the need to use Right Mouse Button in order to perform Zoom In/out in Perspective and Orthographic view
* Reworked Keybindings

Grid

* Added Grid Options (Show/Hide grid, switch to alternative grid with editable color)
* Grid is now changing depending on Metric or Imperial

Snapping

* Snapping option are now saved across project

Feedback

* Added an option to attach images to the feedback form
* Added an option to attach the current project to the feedback form
* Logged out users can now send feedback

Dmx Connections:

* The Dmx Connection now shows a more in depth error message in case something goes wrong

Layers

* Layers selection is now single instead of multiple

Duplicate Along Line/Grid

* Duplicate Along Line/Grid should now work as intended
* Newly duplicated objects will now be selected
* Added “Maintain Selection” which allows to just keep the newly duplicated objects and not the initial one
* Added warning in case the number of duplicates are over 200

Filepicker

* \[Fixed] Fixed a crash with the filepicker in some edge cases
* \[Fixed]\[Windows] The filepicker is now correctly capturing the main window

And a lot more small changes, bug fixes, and stability improvements


# About Carbon for Unreal


# Changelog

Discover the latest updates and features in the Carbon plugin!

## &#x20;<a href="#hs_cos_wrapper_kb-article-module-4" id="hs_cos_wrapper_kb-article-module-4"></a>

## Current Version - 1.8

*7/28/2025*

#### New Features

* Unreal 5.5 and 5.6 Support (5.6 now has native NDI-in support by Epic)
* NEW - Community Edition License - NO WATERMARK!
* NEW - High Performance Take Recorder System
* NEW - Focus Point tool with support for MVR focus point importation
* NEW - MVR Export (patch only)
* EXPERIMENTAL - Start of new user-editable fixture class

#### Quality of Life Improvements

* Added 16-bit color support in LED Tape tool
* Added Universe Overlapping in LED Tape tool
* Sanitize fixture number on MVR import to ignore parenthesis if present
* DMX monitor now shows SACN/Artnet data when used with viz-key simultaneously (viz-key channel monitoring still hidden per viz-key EULA)
* Various Performance tweaks

#### Library

* Added new Acme Tornado Fixture (using new fixture class)
* Added several fixtures from Glow Motion, fully viz-key compliant

#### Bug fixes

* Crash fixed with MVR importation on Mac
* Fixed several fixtures with glowing lenses at dimmer zero
* Channel/Fixture data maintained now when swapping classes
* License Heartbeat fixes
* Offline license reliability improvements

#### **Minor Releases**

#### **Version 1.8.1**

* Repaired console behavior
* Fixes to various Martin fixtures

#### **Version 1.8.2**

* Bugfix for Unreal 5.6.1 for multi-fixture recorder
* Appearance Pass on Portman Fixtures

***

## Previous Versions

### 1.7

*4/7/2025*

#### New Features

* Unreal 5.5 Support (not compatible with previous versions of Unreal)
* Epic Games Megalights Support (beta feature, use may vary)
* NEW - Diagnostics Panel - Also allows for export of report for support tickets
* NEW - Fixture State Viewer - view the state of selected fixture
* NEW - Library Preview Pane

#### Quality of Life Improvements

* Improved clarity on Carbon Settings Panel (Per Light or Global Override)
* Cleaned up emitter settings that self-conflict or are redundant
* Improved Performance on Multi-Instance fixtures

#### Bug fixes

* Crash fixed when using GrandMA3 viz-key version 2.0 or higher
* Repaired framing shutters on many fixtures

### 1.6

*6/5/2024*

#### New Features:

* Built-In DMX Test Console
* MVR Fixture Number Source Selection
* Multi-Instance beam optimization
* Unreal 5.4 compatibility

#### Quality of Life Improvements:

* Added shader rate settings for beams
* Added hotspot mitigation for beams
* Reduced latency from packet-to-pixel
* Take recorder optimizations
* General fixture optimizations
* Improved multi-threading

#### Bug fixes

* Fixed an issue where conventional fixture beams were not fully functional
* Fixed an issue with zoom tables
* Fixed an issue with auto-switch to play mode from take recorder

#### **Minor Releases**

#### **Version 1.6.5**

* Fixed an issue with manual pan/tilt on static fixtures
* Fixed an issue with blade insertion rotation when using framing shutters
* Fixed an issue with the Clay Paky Panify not functioning correctly
* Fixed various other library items

#### &#x20;

### 1.5

*9/12/2023*

#### New Features

* MVR Geometry importing
* MVR Layer Support
* Intelligent blueprint instancing for imported geometry based on Symbol Definitions
* Unreal 5.2 and 5.3 compatibility
* Double Prism support
* Preliminary sequencer and grandMA3 viz-key support for refined FX
* Wireframe coloring

#### Quality of Life Improvements

* Major UI refactor of Carbon panels for style uniformity and improved performance
* Refinement of DMX recorder workflow for improved user experience and reliability
* Refinement of DMX Camera for compliance with GrandMA3 viz-key
* Changed the Import Patch dialogue to improve the user experience and flow
* CSV Import preset for WYSIWYG
* Reduced flickering of multi-instance fixtures at far distances

#### Bug fixes

* Fixed an issue where certain fixtures had no output until the Iris value was adjusted
* Fixed an issue where conventional fixture accessories where non-functional
* Fixed an issue where certain fixtures had non-functional light settings

#### Known Issues:

* Certain fixtures (like JDC-1) will cause a massive performance hit with shadows enabled
* Unicast Connections don't persist after restart. Patch is being worked on now.

#### 1.5 Minor Releases

#### Version 1.5.1

* Added more File Delineation types for CSV Import
* Preliminary fix for Unicast connections not persisting after restart
* Fixed issue where fixture associations would not populate with certain CSV files
* Fixed issue where Swap Fixture Type names would get corrupted
* Fixed issue where Insertion Angle was not working for manual gobo override

#### &#x20;

### 1.4

*11/14/2022*

#### New Features

* Unreal 5.0.3/5.1 Support
* MVR Fixture Import (Patch/placement using Carbon library assets)
* Dramatic performance increases on Multi Instance and tube fixtures with Emissive Only
* Wide Beam Performance Improvements
* Overall Fixture Performance Improvements
* Smoky beam options
* Approximate light method (Preliminary)
* Per-Pixel LED Tape Blueprint
* Setting Panel
* Over 320 Fixtures

#### Fixes

* Updated Cloud License Method (mitigates license resets when moving between computers)
* License warning message clarity for unsupported plugins
* Autopatch now works better with custom Blueprints using increment
* Emissive repaired on Conventional Fixtures
* Autopatch Fixed for Custom BPs

#### Quality of life improvements

* Preview channel count on modes in “Import Patch Dialog”
* GUI Shelf Flyout
* GUI panels now separated for more flexibility
* New Library Icons
* Installer now caches latest version for faster installation
* Removed need to click connection tab before simulating
* Native web browser authentication
* Fixture Beams are now “No Occlusion” by default

#### Known Issues

* Viz Key wont control custom blueprints or FX (workaround-Map these to universe 1 and use the free artnet/SACN output)
* Sequence Recorder may have issues with some fixtures (Fixes are in progress)

#### Minor releases

#### Version 1.4.5

* Compatibility with Perforce Version Control

#### Version 1.4.4

* Code refactor for Transform tools in Carbon Toolbox
* Offline License Checkout Option (only available with Design licenses and up)
* Fixed bug with DMX recorder where certain parameters weren’t recorded into sequencer
* **\[Experimental]** Multiple tilts on a single fixture
* **\[Experimental]** Panify with attachment mount
* **\[Experimental]** Pan/Tilt Motor Dampening Simulation

#### Version 1.4.3

* Compatibility with UE 5.1.1
* Addressed a game thread hang issue that caused the Engine to crash
* Added recording notifications for DMX recorder
* Fixed beams and footprints for conventionals

#### Version 1.4.2

* Disabled Chaos physics simulation on play to optimize cpu usage
* Fixed certain fixtures not obeying settings panel rules
* Enabled smoke effect by default
* Various library fixes and updates

#### Version 1.4.1

* Added Drag and Drop support from Library panel
* Undo Action for Duplicate Array tool
* LED Tape patch fix
* Adjusted global Zoom Attenuation

#### &#x20;

### 1.3

*6/7/2022*

#### New features

* grandMA3 viz-key support (Design Edition and Higher licenses)
* Improved library tab and first run speed
* 2-3X speedup on CPU functions
* Beam Optimizations including soft cap, visibility toggle when light is off/black, wide angle beam attenuation clamp
* Increased library size to 271 Fixtures
* Transition started to UE5 Styling
* Added Carbon Stats in debug panel
* Improved visibility of Emissive fixtures at higher distances
* Phase out Unreal 4.26 Support

#### Known Issues

* grandMA3 viz-key is not supported with custom blueprints
* Conventional fixtures are not recorded by sequencer tools
* Fine Channel leak with Multi-Module fixtures (such as JDC1) causing rendering issue on first instance
* Secondary Prism is not supported with this release
* Some fixtures do not have focus enabled, adding back through upcoming library updates

#### &#x20;

### 1.2

*5/10/2021*

#### New features

* Completely new fixture foundation
* sACN and multiple Art-Net inputs with mapping
* Several Fixture reconciliations
* Under the hood performance optimizations
* Beam Style Unification
* Conventional fixture and accessories
* Applied intensities as Lumens
* Virtual Color Wheel
* Tab Delimited File Import support
* FX Library Refactor
* UX Refinements
* NEW ENGINE SUPPORT – Reality Engine 4.25
* We now support DirectX 12 in **Carbon Version 1.2.1**

#### Known Issues

* Simple occlusions on concave objects cause beams to stop early or not render at all

#### Minor Releases

Version 1.2.3\
Fixes issue with editor crashing when in play mode for an extended period of time (i.e. during long take recorder sessions)

**Version 1.2.2**\
Library updates, various bug fixes

**Version 1.2.1**\
Added support for DirectX 12

#### &#x20;

### 1.1

*2/5/2021*

#### New Features

* Per Light Rendering overrides for resolution, Attenuation, and type
* DMX Sequencer Workflow
* DMX Camera and Camera Manager
* Preliminary Multithreading


# Roadmap

### Learn more about exciting new features in development <a href="#hs_cos_wrapper_kb-article-module-4" id="hs_cos_wrapper_kb-article-module-4"></a>

View the latest roadmap [here](https://roadmap.carbonforunreal.com/)


# Frequently Asked Questions

<details>

<summary><strong>What versions of Unreal Engine are compatible with Carbon?</strong></summary>

Carbon for Unreal currently utilizes Unreal Engine 5.6 and 5.7. Legacy support is available with engine versions 5.2-5.5)For more information, please visit the page on [Getting and Installing Unreal Engine](/carbon-for-unreal/installation/getting-and-installing-unreal-engine)

</details>

<details>

<summary><strong>Is there a Mac Version?</strong></summary>

Carbon for Unreal is available as a beta for mac users. Performance is significantly lower than on comparably priced PCs with dedicated GPUs. Blender maintains a publicly accessible database of GPU rankings that provides a reliable reference for real-world GPU performance. [View the database here.](https://opendata.blender.org/benchmarks/query/?blender_version=4.3.0\&group_by=device_name)

</details>

<details>

<summary><strong>What are the minimum system requirements?</strong></summary>

[View our latest system requirements here.](/carbon-for-unreal/about-carbon-for-unreal/system-requirements)

</details>

<details>

<summary><strong>Is there an evaluation version available?</strong></summary>

[Please contact our sales department for an evaluation license.](mailto:sales@imaginary-labs.com)

</details>

<details>

<summary><strong>Do you have a list of fixtures that are included in Carbon for Unreal?</strong></summary>

[View our current list of Library assets here.](https://www.carbonforunreal.com/library)

</details>

<details>

<summary><strong>How do I request a new lighting fixture or library asset, and how long does it take to complete?</strong></summary>

Typical turn around is currently 3-4 weeks for standard priority fixture requests. We offer priority fixture build service for a fee with a 7 day or less turn-around for mission-critical projects. For standard priority requests with no fee, [click here](https://support.carbonforunreal.com/knowledgebase/requesting-new-library-items?hsLang=en). For priority requests please contact <sales@imaginary-labs.com>

</details>

<details>

<summary><strong>Is it possible to make my own fixture?</strong></summary>

We are developing a fixture creator for Carbon, which will be announced soon. In the meantime, you can use Blueprint widgets to make anything controllable via Carbon's DMX system. To get started with making your own custom Carbon blueprints, please read through the section on [User Created Blueprints.](/carbon-for-unreal/using-and-modifying-assets/user-defined-blueprints)

</details>

<details>

<summary><strong>Will Carbon for Unreal work in Multi-user sessions?</strong></summary>

We are researching this exciting workflow and will share more soon.

</details>

<details>

<summary><strong>How can I tell if I have the latest release of Carbon for Unreal?</strong></summary>

There is a dynamic message on the bottom of the Unreal Status bar that will notify you of any new versions.

</details>

<details>

<summary><strong>Is Carbon for Unreal a Project Plugin or an Engine Plugin?</strong></summary>

We opted to develop Carbon as a Project plugin, so every project can use a different version of the plugin if needed. This is to support projects with long lifecycles or ones that need to be revisited at a later date.

</details>

<details>

<summary><strong>Can I package my project as a standalone executable?</strong></summary>

Carbon for Unreal is a pre-compiled plugin, and therefore does not contain any source files. Current licensing disallows the packaging of Carbon as a redistributable. Users can apply for exceptions to this rule if you work with Imaginary Labs as a project partner.

</details>


# System Requirements

### Carbon for Unreal harnesses cutting edge technology that pushes the limits of modern computing. <a href="#hs_cos_wrapper_kb-article-module-4" id="hs_cos_wrapper_kb-article-module-4"></a>

We recommend the following minimum system requirements for best experience.

#### PC:

* Unreal Engine Version 5.5 or 5.6 (legacy support for 5.2-5.4)
* Windows 10/11 64 Bit
* Intel i7/i9 CPUs with boost clock rates above 4.7ghz
* 32GB ram
* Nvidia Geforce RTX 2070, Quadro RTX 6000 or better GPU (not yet tested on AMD hardware)
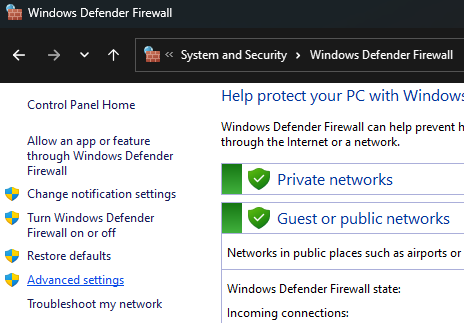
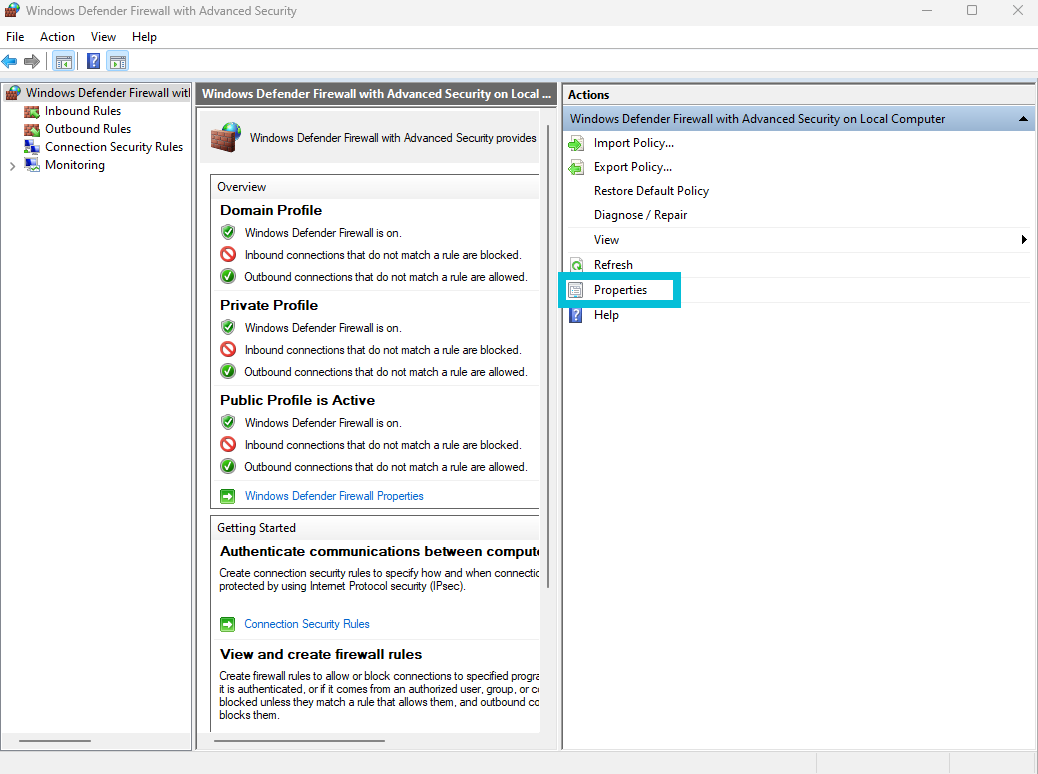
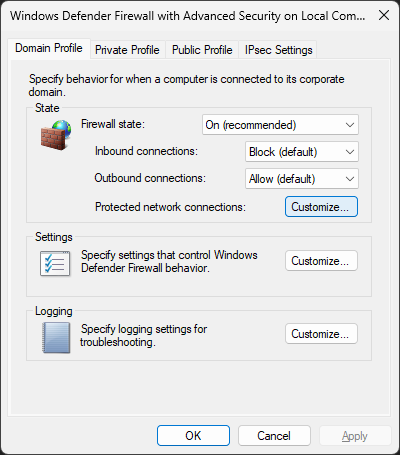
* Gigabit Ethernet adapter with [firewall disabled](/carbon-for-unreal/settings-and-tips/computer-settings#firewall-bypass)
* Internet connection on separate adapter

#### MAC:

Mac computers will be substantially slower than their comparably priced PCs. For comprehensive performance comparisons, we recommend consulting Blender’s publicly available database, which ranks machines and GPUs by real-world performance. [View the database here.](https://opendata.blender.org/benchmarks/query/?blender_version=4.3.0\&group_by=device_name)


# Installation


# License Management

Learn how to purchase and manage your licenses

### Purchasing your license

Carbon for Unreal is licensed on a per-user subscription basis. You may install Carbon on multiple computers, however only one machine may be active per license. Options and purchasing information are available at [carbonforunreal.com/pricing](https://www.carbonforunreal.com/pricing). Functionality of Carbon for Unreal is restricted without a valid license in use.

### Signing up

To create a new Imaginary account, please visit <https://carbonforunreal.com/onboard> and create an account using the same email address as you use for your purchases. You will receive an email to verify ownership of your address within a few minutes. If it does not appear in your inbox, please check your spam or junk mail folders.

### Managing an existing license

To manage an existing license, please visit [https://portal.carbonforunreal.com](https://portal.carbonforunreal.com/) and log in using the email address associated with your Carbon account.


# Getting and installing Unreal Engine

Installing Unreal Engine into your system requires a few easy-to-follow steps: Downloading the Epic Games Launcher, Creating an Epic Games Account, and Installing the engine.

{% hint style="info" %}
*An in-depth guide for installing Unreal Engine can be found directly from Epic Games here:*

[***Official Unreal Engine Installation Guide***](https://docs.unrealengine.com/5.0/en-US/installing-unreal-engine/)
{% endhint %}

## Installation

**License Type**

For most users, if/when prompted with a license type request, a basic "Creators" license should suffice to run Carbon.

&#x20;

### **Epic Games Account Sign-In**

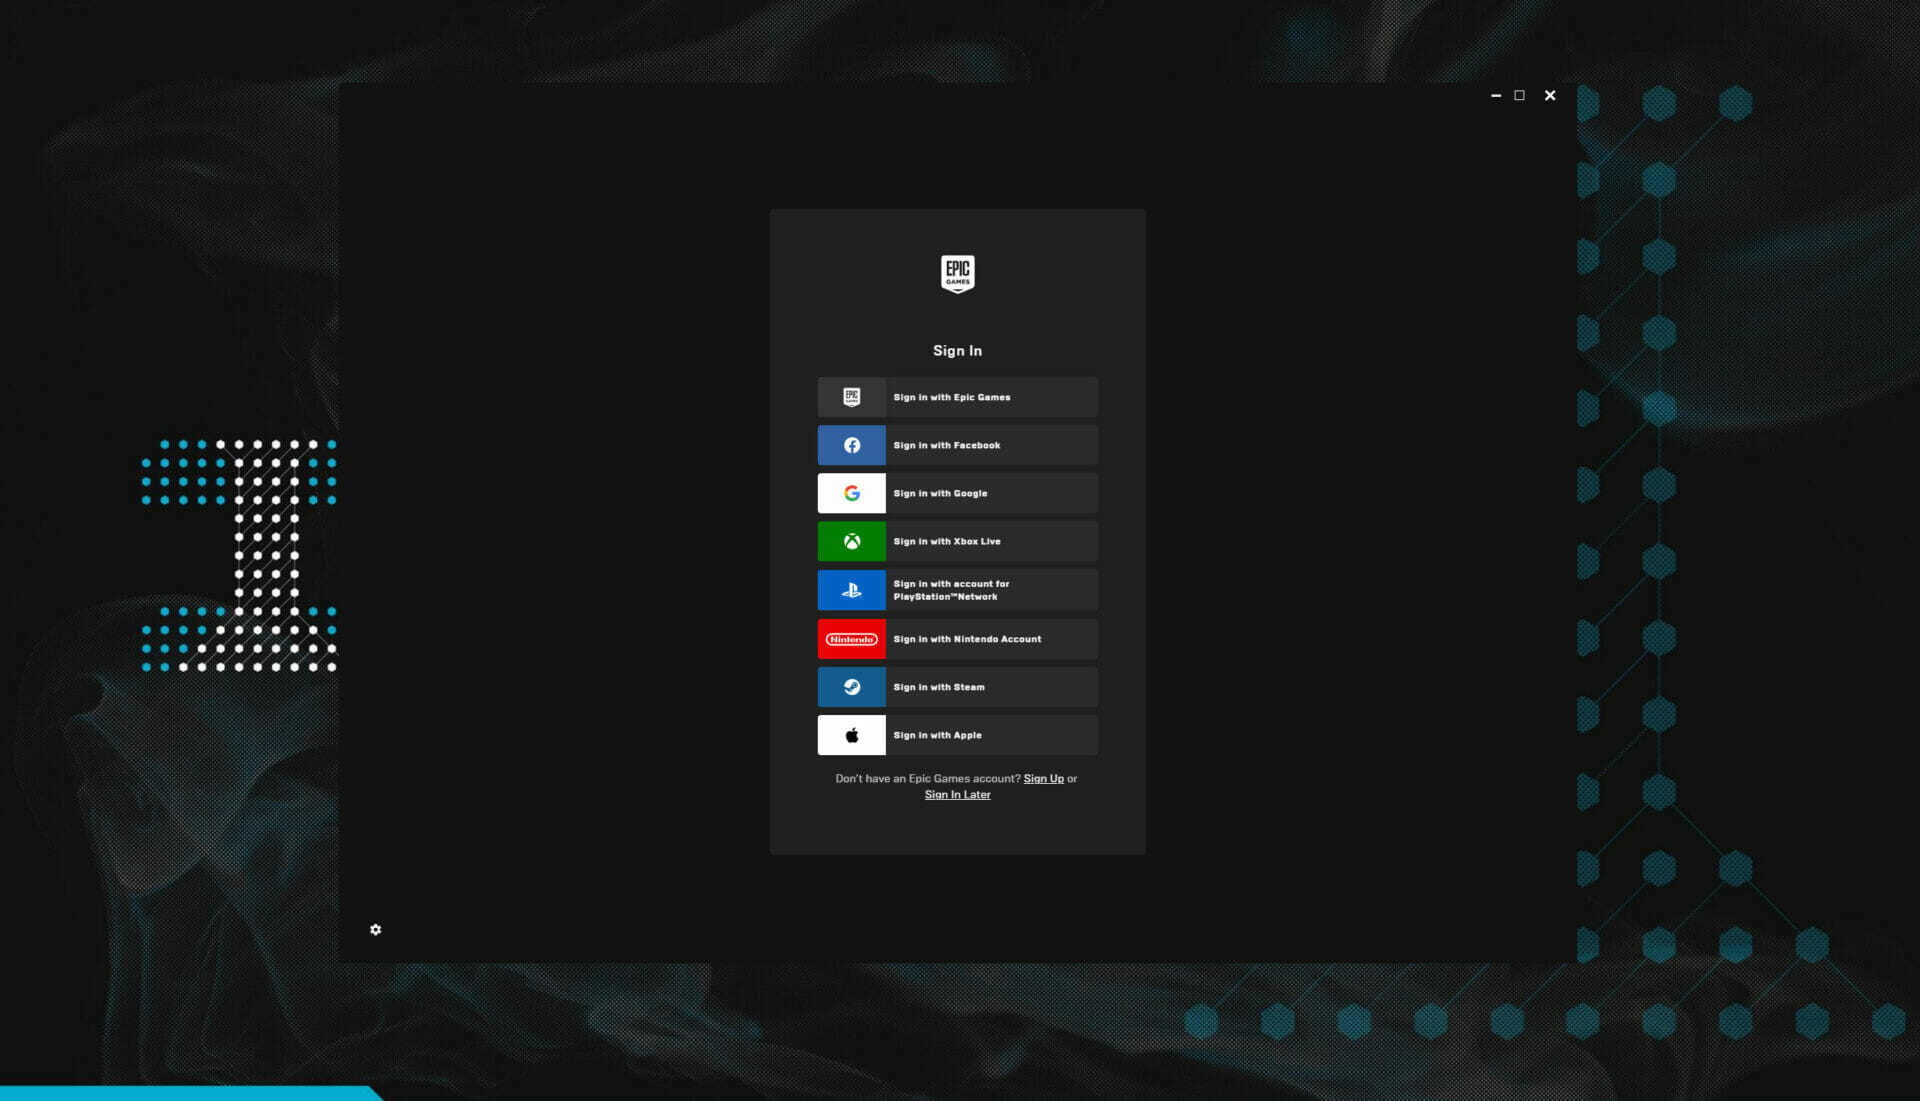
If you do not have an Epic Games account, you will need to create one. This login is **not** your Carbon Cloud license, but you will need an Epic Account to access your projects and Unreal Engine updates. You can sign up for an Epic Account with your email, or any of the supported social media or gaming platform accounts listed on their launcher.

<figure><img src="https://support.carbonforunreal.com/hubfs/Knowledge%20Base%20Import/cdn-assets.carbon.showkbcarbon-plugininstallationepicgames-login.jpg" alt=""><figcaption></figcaption></figure>

### **Engine Installation Options**

Once the Epic Games Launcher is installed, and you have signed into your Epic Account, you should be free to begin downloading your Engine Version.

{% hint style="info" %}
**The current version of Carbon (1.8) currently runs on Unreal Engine 5.5 and 5.6.**<br>
{% endhint %}

When selecting from the dropdown arrow of your engine, please choose one of our currently supported engine versions unless otherwise directed.
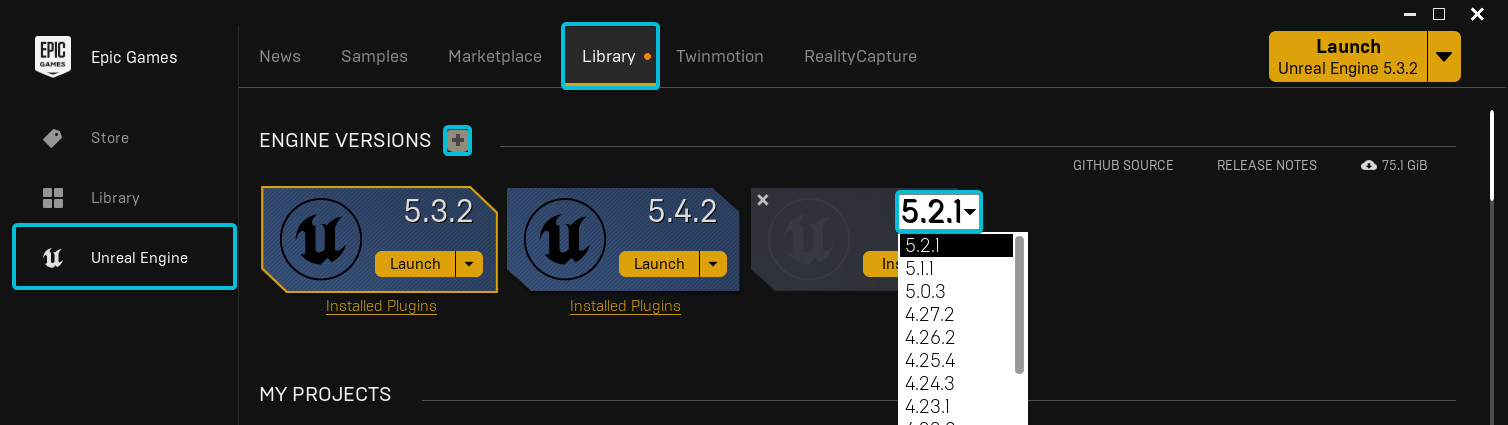
<figure><img src="https://support.carbonforunreal.com/hubfs/Knowledge%20Base%20Import/cdn-assets.carbon.showkbcarbon-plugininstallationue-version-select.png" alt=""><figcaption></figcaption></figure>

&#x20;

During Installation, we can customize our installation to make Unreal Engine lighter. For Carbon, you can select to omit the extra mobile and target platform packages, as they are not needed to run the Carbon for Unreal plugin, and will allow for a smaller/faster installation process. Be sure to go into the installation options before hitting install.

&#x20;

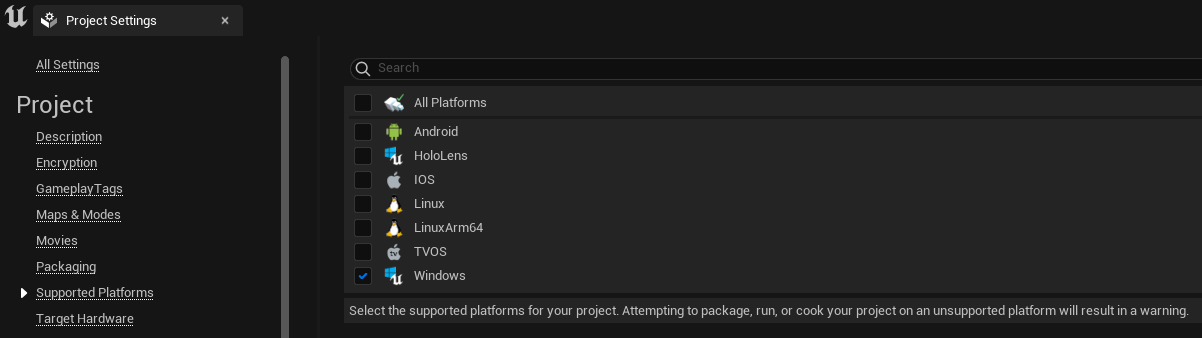
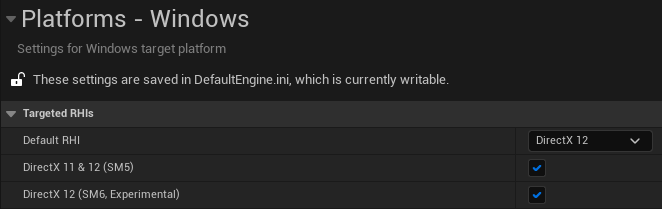
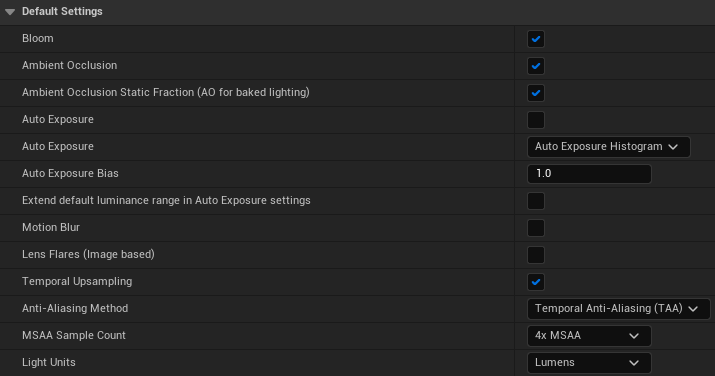
![](https://support.carbonforunreal.com/hubfs/Knowledge%20Base%20Import/cdn-assets.carbon.showkbcarbon-plugininstallationue-install-prompt.png)![](https://support.carbonforunreal.com/hubfs/Knowledge%20Base%20Import/cdn-assets.carbon.showkbcarbon-plugininstallationue-install-platforms.png)

*The following target platforms can be unchecked when using Carbon: Android, HoloLens 2, iOS, Linux, TVOS*

&#x20;

After installation is complete you should now be ready to launch your new installation of the Unreal Engine.


# Creating your first project

## Creating your first project <a href="#hs_cos_wrapper_kb-article-module-3" id="hs_cos_wrapper_kb-article-module-3"></a>

Once you have installed the Unreal Engine on your computer, you are ready to create your first project. If you need help with installing Unreal Engine, please view the previous section ["Getting and Installing Unreal Engine"](/carbon-for-unreal/installation/getting-and-installing-unreal-engine)

### Launch the Unreal Engine

Using the Library Tab of your Epic Games Launcher, you can launch any of your currently installed versions of the Unreal Engine. To create a new project, start by launching your newly installed version of Unreal with the "Launch" button provided.

### Name and Create a Project from the Launcher

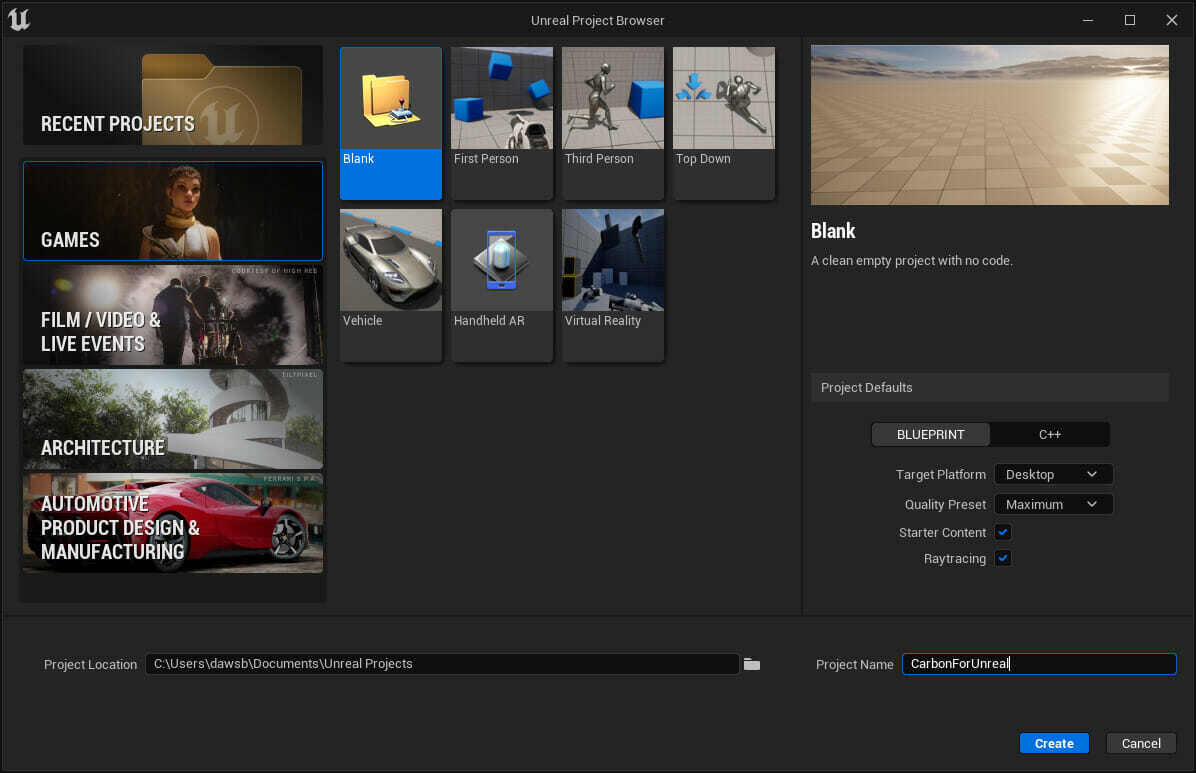
After a short loading period, you will be presented with an Unreal Project Browser/Creator. Here you have access to a series of starter templates, archetypes, or coding packages to get a running start. For a first-time project, select the "**Blank**" template from the "**Games**" category. This will generate an empty project with no unnecessary code added. Project Defaults can remain at a default, however, include Starter Content and Raytracing to enable the best visuals and some simple starter assets to build with.

{% hint style="warning" %}
***CAUTION - For the project location and Path, it is not advised to host the project in any locations that are actively synced by Dropbox, Google Drive, Box, Etc. This can cause issues with file corruption. Use of Source control such as Plastic or Perforce are recommended for groups and those using more than one computer.***
{% endhint %}

&#x20;

<figure><img src="https://support.carbonforunreal.com/hubfs/Knowledge%20Base%20Import/cdn-assets.carbon.showkbcarbon-plugininstallationFirstProject.jpg" alt=""><figcaption></figcaption></figure>

*After setting the defaults, naming and saving the project to your preferred folder location, hit "**Create**".*

### Wait for the Project and Shaders to Compile

After naming and creating the project, Unreal will launch and begin loading the engine for use. This process takes a little time depending on the speed of your computer. Compiling shaders on your first startup takes a while; you will be automatically entered into the project process is complete. (This process will be faster on subsequent project openings)

<figure><img src="https://support.carbonforunreal.com/hubfs/Knowledge%20Base%20Import/cdn-assets.carbon.showkbcarbon-plugininstallationcompiling_Shaders.jpg" alt=""><figcaption></figcaption></figure>

&#x20;

### Entering your First Project

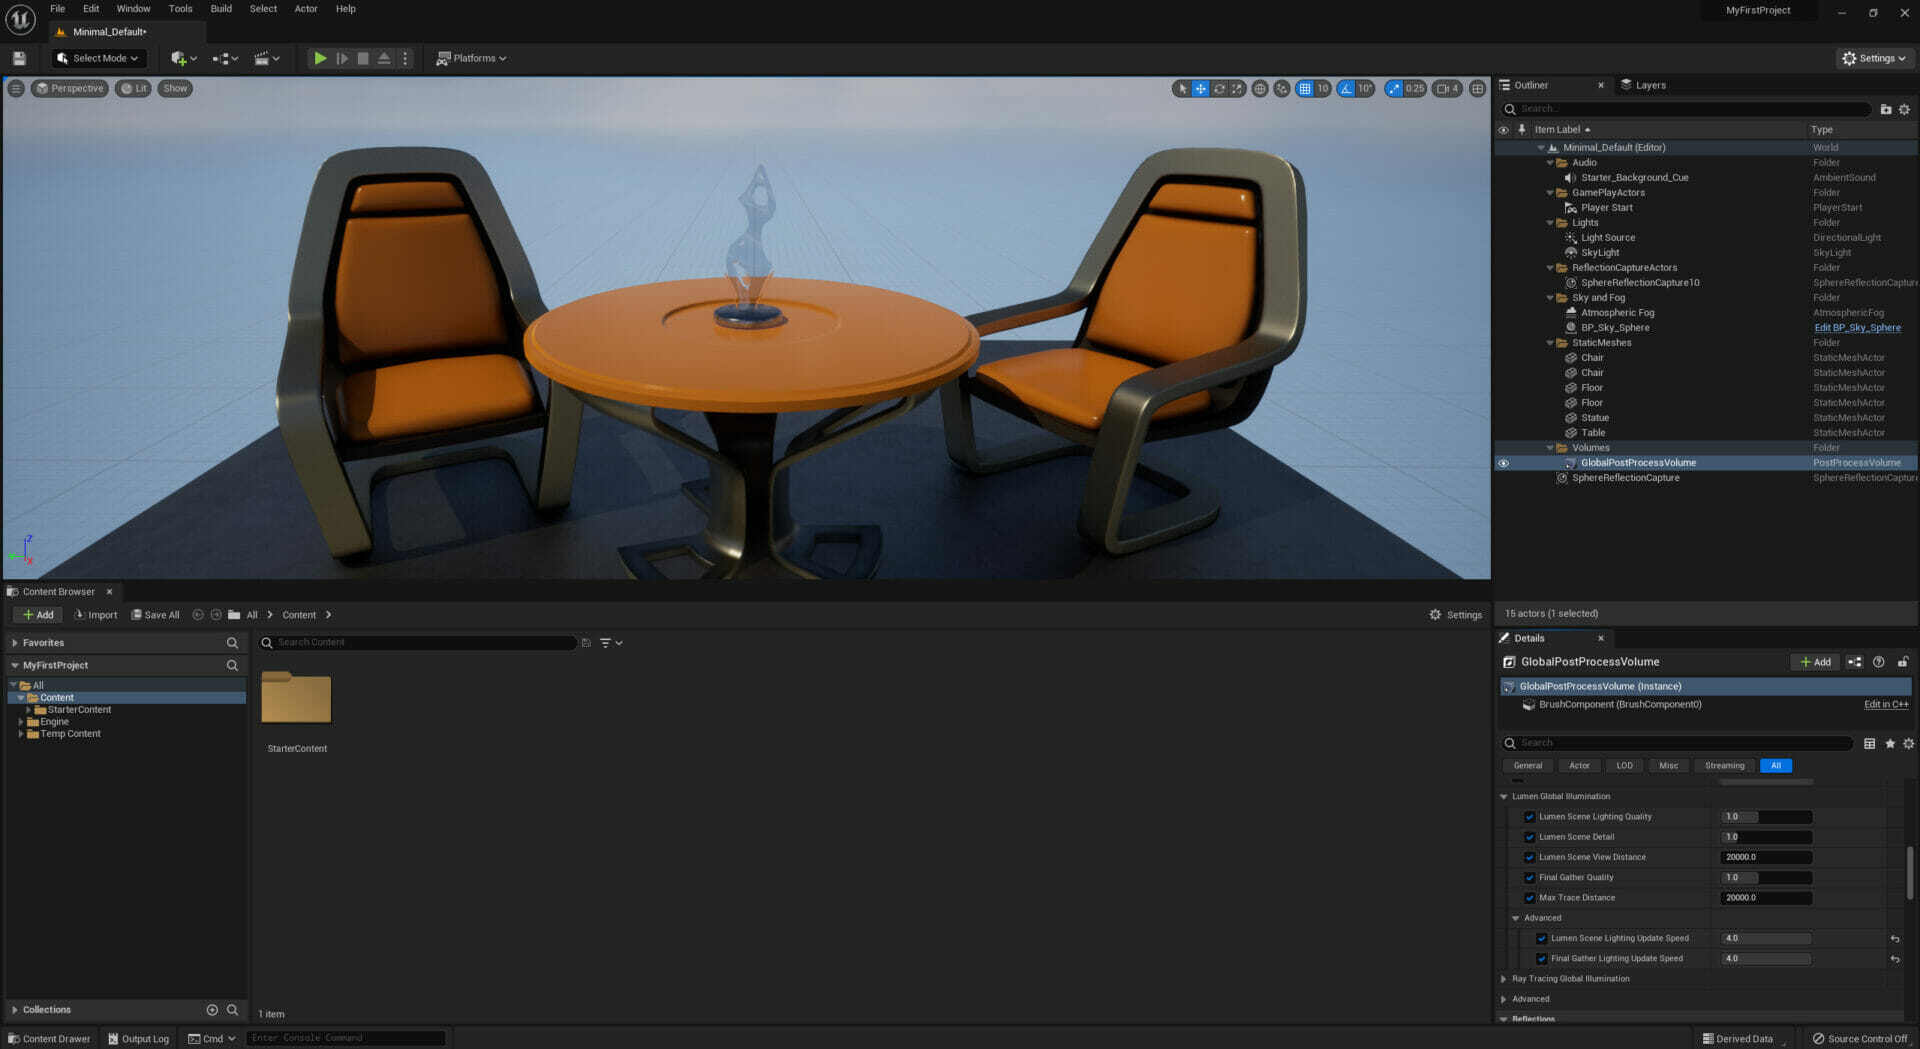
Once compiled, the project will open to a default map. You now have access to an unreal project to personalize, build, or test from. It may show a Plugins window which show which plugins are loaded and which are available to be loaded. It is not necessary to load any additional plugins unless you have specific needs.

<figure><img src="https://support.carbonforunreal.com/hubfs/Knowledge%20Base%20Import/cdn-assets.carbon.showkbcarbon-plugininstallationUnreal_Plugins_Start.jpg" alt=""><figcaption></figcaption></figure>

&#x20;

The project is now ready for Carbon for Unreal Plugin installation

<figure><img src="https://support.carbonforunreal.com/hubfs/Knowledge%20Base%20Import/cdn-assets.carbon.showkbcarbon-plugininstallationUnreal_ready.jpg" alt=""><figcaption></figcaption></figure>


# Installing Carbon for Unreal

{% hint style="warning" %}
Before installing/updating the Carbon for Unreal Plugin on any project, be sure to save and close any open instances of the Unreal Engine.
{% endhint %}

## **PC Installation**

### **Download the Carbon for Unreal Installer**

To get started with Carbon for Unreal, download the Carbon for Unreal installer from your [Carbon Portal](https://portal.carbonforunreal.com/). Extract the installer from the .zip archive and run the CarbonInstaller Windows executable.

**Mac - Download the Mac DMG Package**

### Install using Automatic Installer

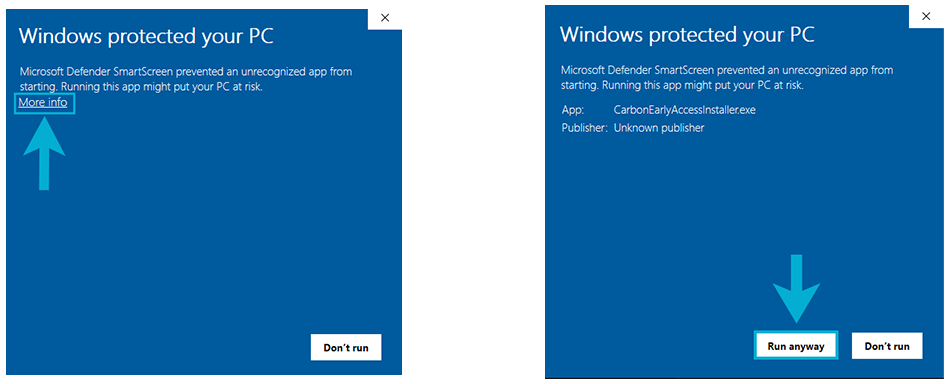
The Carbon for Unreal installer will automatically download and place the plugin in the correct directory in your Unreal project. Upon running the Carbon Installer Windows executable, you may be met with a Windows SmartScreen window. Click on **More info**, then **Run anyway**. The Carbon for Unreal installer will launch.

&#x20;

&#x20;*Windows SmartScreen dialog box*

<figure><img src="https://support.carbonforunreal.com/hubfs/Knowledge%20Base%20Import/cdn-assets.carbon.showkbcarbon-plugininstallationwindows-smartscreen.png" alt=""><figcaption></figcaption></figure>

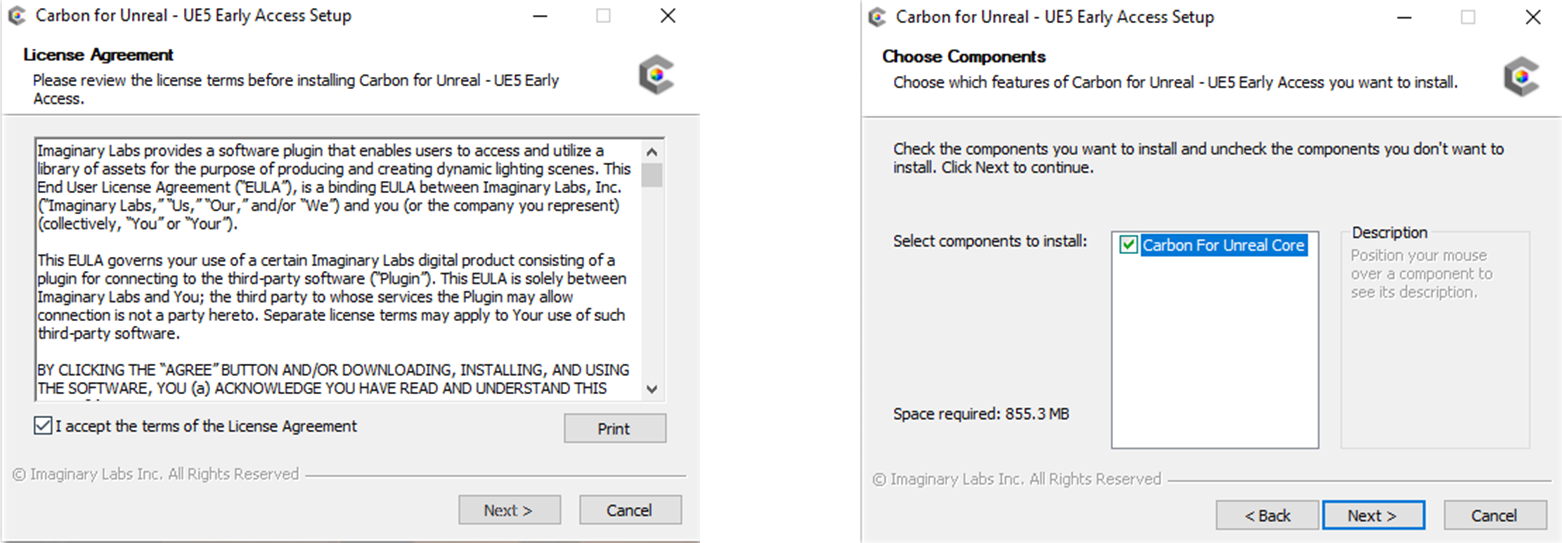
Upon launch of the installer, first review and accept the license terms and make sure that the Carbon for Unreal Core component is checked.

&#x20;

&#x20;*License Agreement and installation components*

<figure><img src="https://support.carbonforunreal.com/hubfs/Knowledge%20Base%20Import/cdn-assets.carbon.showkbcarbon-plugininstallationcarbon-installer-1.png" alt=""><figcaption></figcaption></figure>

&#x20;

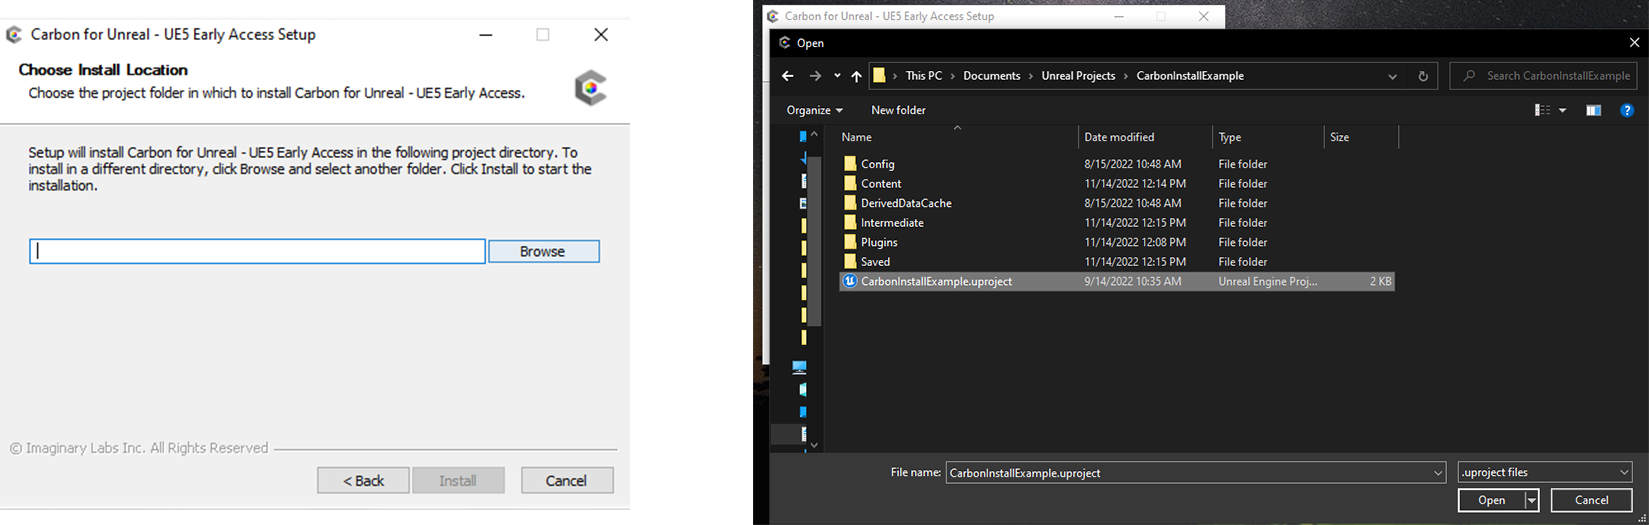
Then click browse to specify the directory of the Unreal project you wish to install Carbon into and select the project's .uproject file. Click Install.

&#x20;

*Selecting the Unreal project*

<figure><img src="https://support.carbonforunreal.com/hubfs/Knowledge%20Base%20Import/cdn-assets.carbon.showkbcarbon-plugininstallationcarbon-installer-2.png" alt=""><figcaption></figcaption></figure>

&#x20;

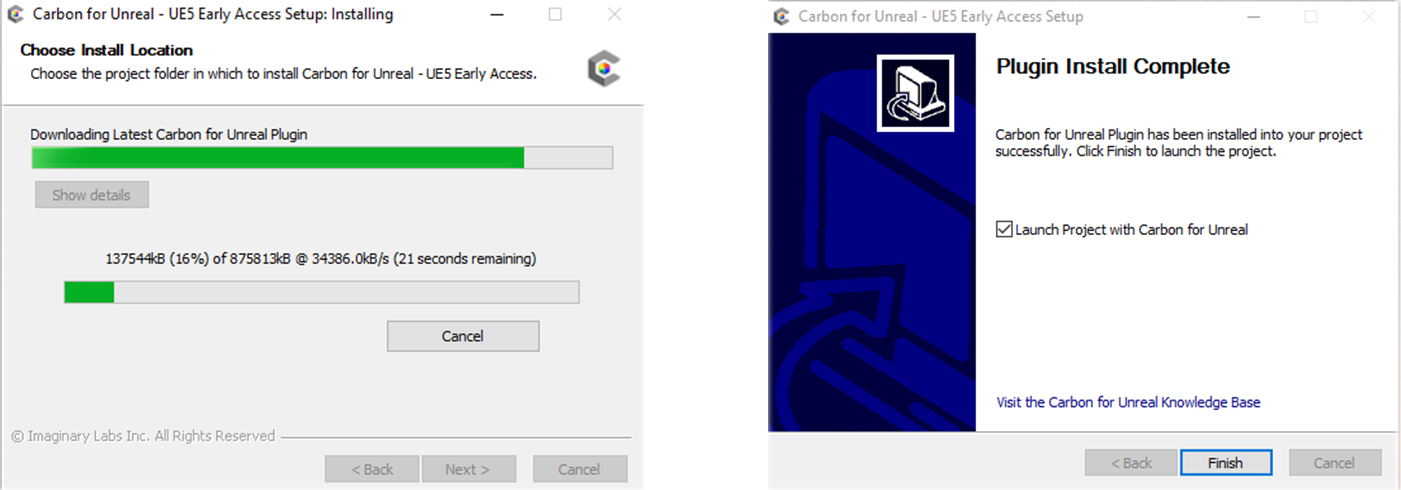
Allow the installer to install Carbon for Unreal into the specified Unreal project. Once finished, click the check box to automatically launch Carbon for Unreal.

&#x20;

&#x20;*Automatic install of Carbon for Unreal*

<figure><img src="https://support.carbonforunreal.com/hubfs/Knowledge%20Base%20Import/cdn-assets.carbon.showkbcarbon-plugininstallationcarbon-installer-3.png" alt=""><figcaption></figcaption></figure>

**Updating from a previous version of Carbon for Unreal**

The Carbon for Unreal installer can also be used to update a project from a previous version of the plugin. The installer will automatically remove the old version and install over with the new version. **This is only applicable for updates on the same version of Unreal Engine.**

*It is highly recommended to back up your patch to a .csv file using the “patch save tool”, and saving a **copy of your project folder** before updating.*

For upgrading a project to a new version of Unreal Engine in-place, please see[ Upgrading an existing project in-place.](/carbon-for-unreal/installation/upgrading-carbon-on-existing-projects)

***

### Manual Installation

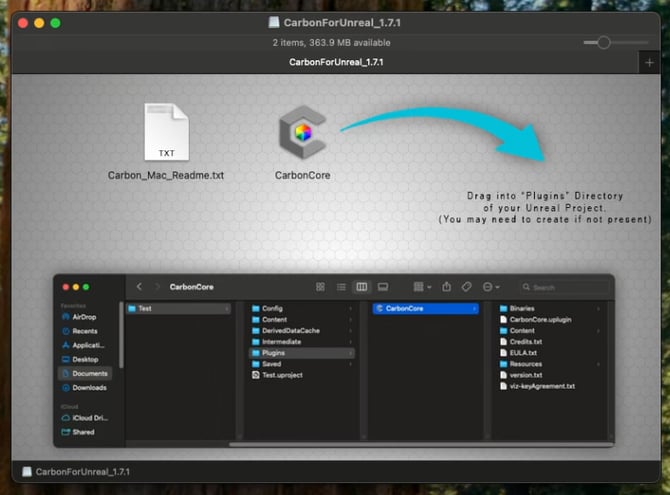
If you ever have to manually install Carbon for Unreal, simply drag the "CarbonCore" folder into the plugins folder of your Unreal Project. **(Note: When manually updating the plugin, please delete the old plugin folder before installing the new version.)**

![](https://support.carbonforunreal.com/hubfs/Knowledge%20Base%20Import/cdn-assets.carbon.showkbcarbon-plugininstallationmanual-install.png)

## Mac Installation

At this time, there is no installer for the Mac Platform. Instead, you will simply drag "CarbonCore" into the \Plugins directory of the unreal project you wish to use with Carbon. Mac sure the downloaded package matches the engine version of the project.

<img src="https://support.carbonforunreal.com/hs-fs/hubfs/mac_install.png?width=670&#x26;height=496&#x26;name=mac_install.png" alt="mac_install" height="496" width="670">


# Upgrading Carbon on existing projects

Migrate an existing Carbon project to a new version of Unreal Engine

## Upgrading project in-place

Follow these steps to perform the in-place upgrade of your Carbon project:

{% hint style="info" %}

### Prerequisites

Prior to commencing the upgrade process, please ensure the following prerequisites are met:

* **Unreal Engine Installation:** Verify that the desired Unreal Engine version is\
  [installed via the Epic Games Launcher.](https://support.carbonforunreal.com/knowledgebase/getting-and-installing-unreal-engine?hsLang=en)
* **Carbon for Unreal Installer:** Obtain the latest Carbon for Unreal installer from the [Carbon Portal](https://portal.carbonforunreal.com/).
* **Custom Modifications (Optional):** If you have made any modifications to Carbon blueprints, it is highly recommended to document these changes (e.g., modifying fixture settings).&#x20;
  {% endhint %}

### **Step 1: Close Unreal Engine**

To avoid any issues, ensure that all instances of Unreal Engine are completely saved and closed on your machine.&#x20;

### **Step 2: Backup your Project**

Before proceeding with any modifications to your project, create a complete backup of your entire Unreal Engine project folder. **Copy the entire project directory** and paste to a secure and separate location, such as a dedicated "backups" directory.

{% hint style="warning" %}
It is highly recommended to compress the backup project to a ZIP file to reduce file size and protect your project.
{% endhint %}

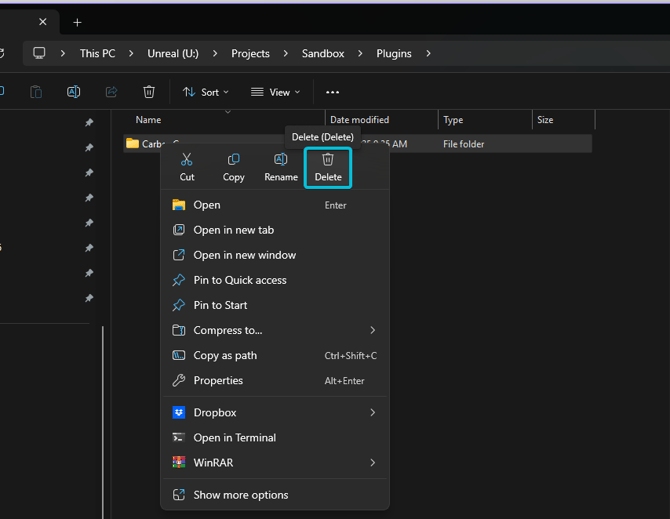
### **Step 3: Delete the Existing Carbon Plugin**

Navigate to your project's **Plugins** folder, located at `<projectRoot>\Plugins`. Within this directory, locate and delete the **CarbonCore** folder.&#x20;
<figure><img src="https://support.carbonforunreal.com/hs-fs/hubfs/delete.png?width=670&#x26;height=519&#x26;name=delete.png" alt=""><figcaption></figcaption></figure>

&#x20;

### **Step 4: Associate Project with New Unreal Engine Version**

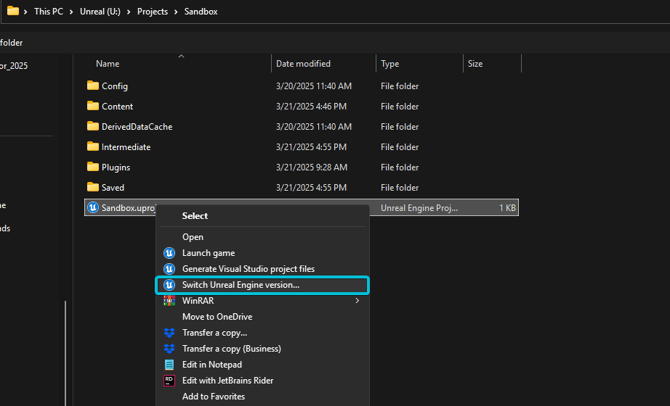
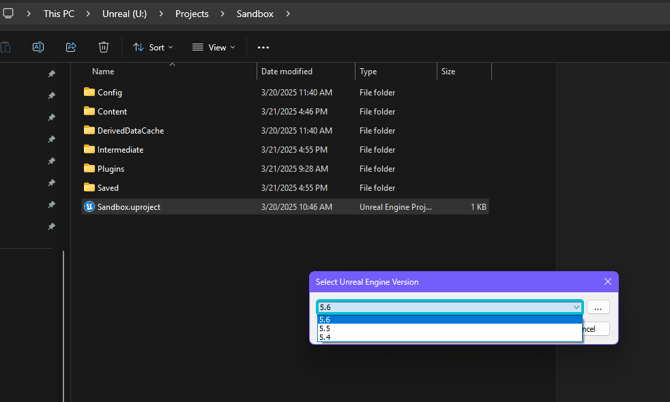
At the root of your project folder, locate your project's **.uproject** file. Right click on this file and select the **Switch Unreal Engine version...** option. From the drop-down list that appears, choose the new Unreal Engine version you wish to associate with and use for this project.

<img src="https://support.carbonforunreal.com/hs-fs/hubfs/switch%20Unreal%20version.png?width=670&#x26;height=407&#x26;name=switch%20Unreal%20version.png" alt="switch Unreal version" height="407" width="670">

<img src="https://support.carbonforunreal.com/hs-fs/hubfs/version.png?width=670&#x26;height=403&#x26;name=version.png" alt="version" height="403" width="670">

&#x20;

### **Step 5: Install the New Carbon Plugin**

Execute the Carbon for Unreal installer package. During the installation wizard, it is crucial to select the newly associated Unreal Engine project as the target directory for the plugin installation. For a more thorough walk-through on the Carbon installation process, please follow the article on [Installing Carbon for Unreal.](/carbon-for-unreal/installation/installing-carbon-for-unreal)

### **Step 6: Open Your Upgraded Project**

Once the plugin installation is complete, open your project. You can do this either through the Epic Games Launcher or by double clicking the **.uproject** file. After the project has fully loaded, verify that Carbon for Unreal is installed in your project&#x20;


# Menus, Panels, and Tools


# Carbon Menu

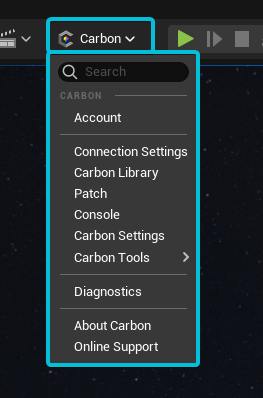
The Carbon Menu hosts everything you will need to utilize Carbon for Unreal in a project, and is located on Unreal Engine 5's main toolbar on the top left of the editor. The dropdown menu provides access to all core panels and tools included with the Carbon for Unreal plugin.&#x20;

![](https://support.carbonforunreal.com/hubfs/Knowledge%20Base%20Import/cdn-assets.carbon.showkbcarbon-plugininterfacecarbon-menucarbon-menu.png)


# Panels


# Account

Activate and Manage Carbon Licenses with Ease through the Account Panel.

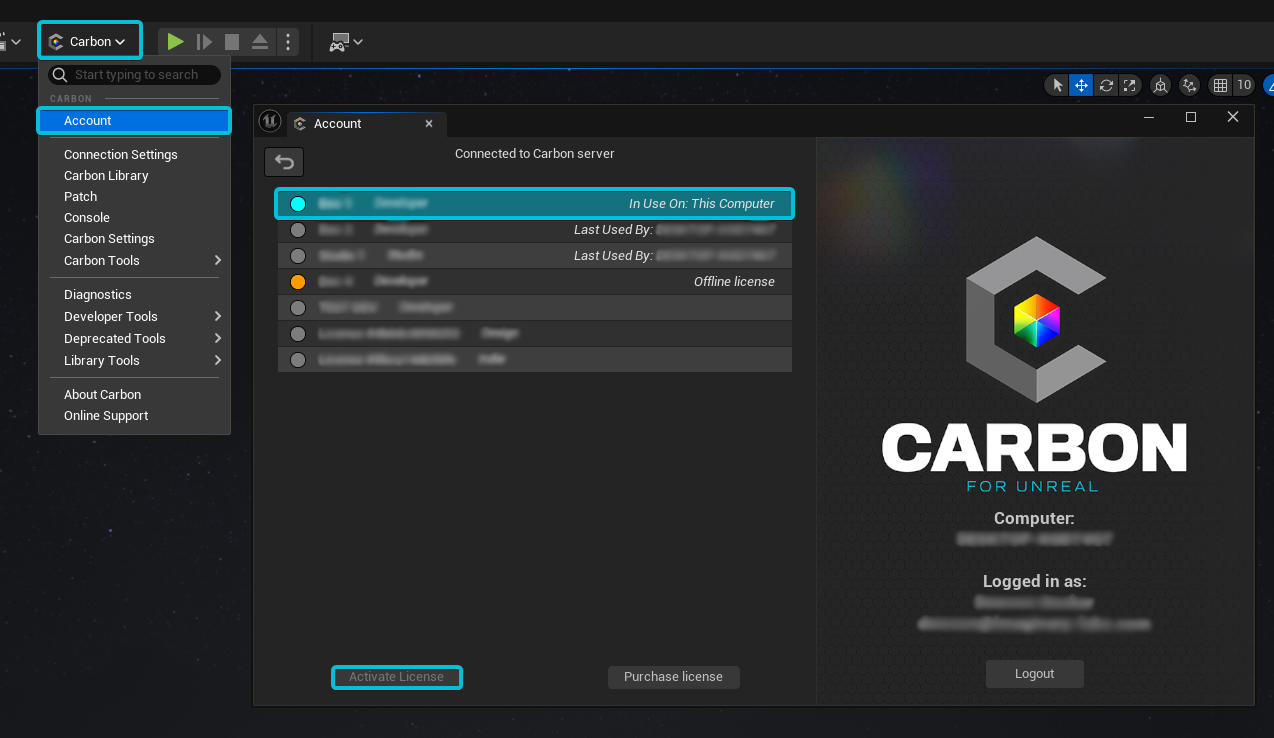
The Account Panel allows for the management and activation of Carbon licenses. The first time the panel is opened, a welcome page will appear with options to sign into your Imaginary Labs account. After login, users are able to activate and check the status of licenses assigned to their account.

After logging in, a license can be activated by simply selecting the license that you wish to use, then click the "Activate Selected License" button. If the license is active, Carbon will enable DMX functionality. This can be verified by looking at the status bar on the bottom right of the editor.
&#x20;

<figure><img src="https://support.carbonforunreal.com/hubfs/Knowledge%20Base%20Import/cdn-assets.carbon.showkbcarbon-plugininterfacecarbon-menuaccount-panel.png" alt=""><figcaption></figcaption></figure>

{% hint style="info" %}
**Note:** Teal indicates the currently active license, Orange indicates a license that was in use in the last 10 minutes.
{% endhint %}


# Connection

Establishing connections with various DMX protocols in Carbon.

## Supported Connections

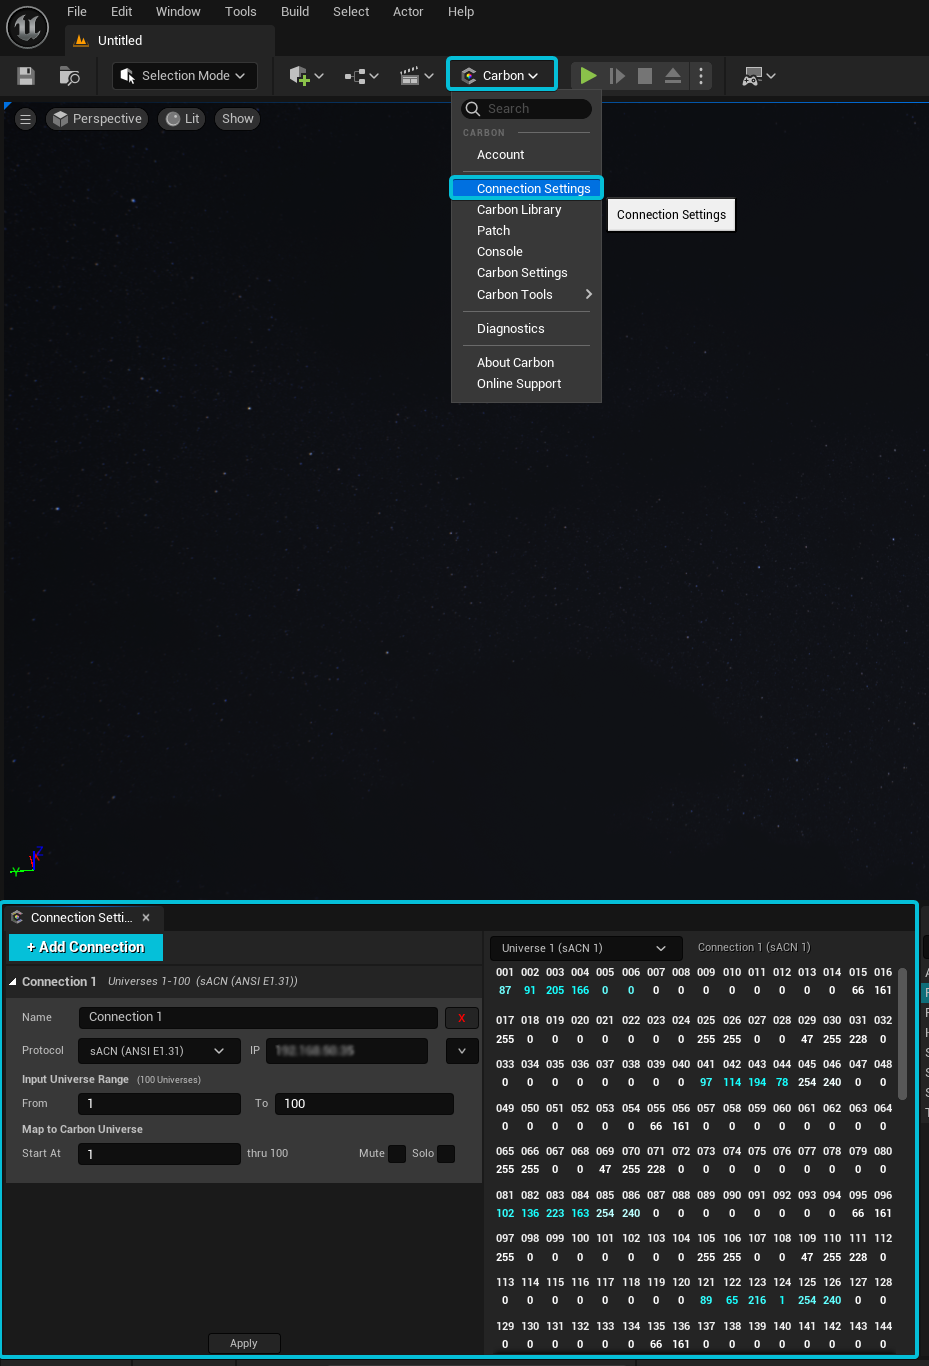
External DMX control of fixtures and other controllable elements in Carbon for Unreal is configured in the Connection Panel. Carbon for Unreal supports the following DMX over Ethernet protocols for external control:

* Art-Net™
* sACN (ANSI E1. 31)
* grandMA3 viz-key<sup>1</sup><br>

Input DMX data from any of these sources can be received and mapped to Carbon Universes to control fixtures. It is important to remember fixture patches in Carbon for Unreal refer to the Carbon Universe that the fixture is patched to, not necessarily the universe of the protocol being used to send the data. Connecting a protocol’s data to a Carbon Universe is done in the Connection tab.

New connections are created with the “+Add Connection” button near the top of the panel in the Connection tab of the Carbon Core toolbar.

Connections will be added to the list below the “+Add Connection” button. Each connection is contained in a collapsible section. The section can be collapsed and expanded by clicking on the connection’s header bar. The header bar will always display the connection name, Carbon Universe range, and protocol type of the connection, as well as indicators if the connection has been muted or is soloed. A red exclamation mark will also appear in the connection header if there are any issues with the connection configuration.

Connections can be removed by clicking the “X” button to the right of the “Name” text field when the section is expanded.

<sup>1</sup>viz-key support is not available for all Carbon for Unreal license types.

## Connection Settings

### &#x20;Common Settings

<figure><img src="https://support.carbonforunreal.com/hubfs/Knowledge%20Base%20Import/cdn-assets.carbon.showkbcarbon-plugininterfacecarbon-menuconnection-settings.png" alt=""><figcaption></figcaption></figure>

| **Name**                  | A friendly name to label a connection.                                                                                                                                                          |
| ------------------------- | ----------------------------------------------------------------------------------------------------------------------------------------------------------------------------------------------- |
| **Type**                  | The DMX over Ethernet protocol the connection is using                                                                                                                                          |
| **IP/Interface**          | The IPv4 address of the interface this connection will listen on. A list of active IP addresses on the current machine can be opened using the dropdown arrow to the right of the text box      |
| **Input Universe Range**  | The range of universes to listen to from this protocol. If the protocol is sending additional universes of data they will be ignored                                                            |
| **Carbon Universe Range** | The range of Carbon Universes that the data will be mapped to. Only one connection may map to a given Carbon Universe at a time                                                                 |
| **Mute**                  | Forces all channels of the connection to 0                                                                                                                                                      |
| **Solo**                  | Mutes all other connections and only reads values from this connection. If multiple connections are soloed, they will all receive data. Solo overrides mute if both are enabled on a connection |

{% hint style="warning" %}
Every time a parameter is changed it must be applied to take effect. Connections with pending changes will be marked with an asterisk by their name. Changes are applied using the “Apply” button at the bottom of the panel. Changes that are not applied will not persist if the Unreal Project is closed and reopened.
{% endhint %}

{% hint style="warning" %}
Any error messages associated with the connection will appear in red below the connection header bar.
{% endhint %}

### Art-Net

Carbon for Unreal supports receiving DMX512 data over an Ethernet connection using the Art-Net protocol. Carbon for Unreal supports version 4 of the Art-Net protocol.

### sACN

Carbon for Unreal supports receiving DMX512 data over an Ethernet connection using the ANSI E1.31 protocol, otherwise known as Streaming ACN (or sACN). The sACN protocol supports receiving data in both unicast and multicast modes. There is no need to set whether the connection should listen for unicast or multicast, the connection will always subscribe to the appropriate multicast groups for the set Input Universe Range, and will also listen for unicast data on those universes at the same time.

### grandMA3 viz-key

Carbon for Unreal can join an MA3 session as a visualizer using a grandMA3 viz-key. When in session with a grandMA3 console or onPC session Carbon for Unreal will have access to all granted and non-granted parameters of the session to provide a convenient way for programmers to connect their console to Carbon for Unreal without having to worry about parameter count or re-configuring DMX output.


# Library

Browse our library of ready-to-use assets

## Exploring the Library Panel

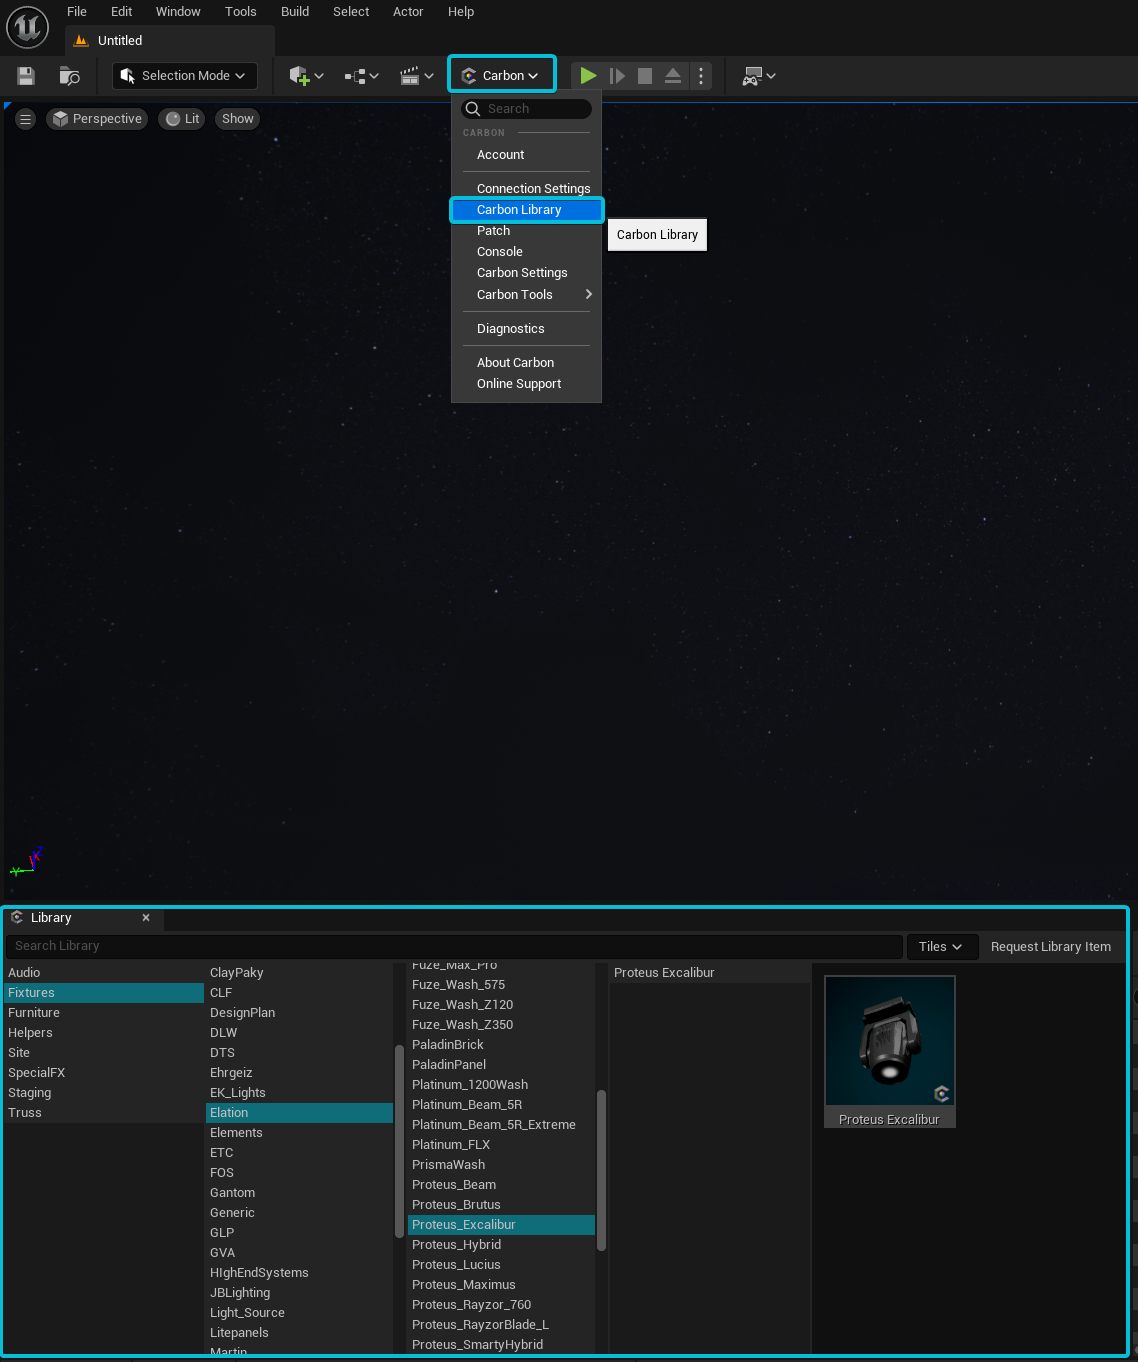
Carbon makes it easy to manually add new lights to a scene from a built-in library of fixtures. The library can be accessed via the Carbon Dropdown on the top of the Unreal Engine 5 interface. The first section on the left is the Miller Column file tree and is a visual representation of the library sorting system. This file tree will allow you to narrow library assets down to a specific filter set based on the options you select in the columns. The right side of the library window houses the resulting fixture assets that the library contains.

<figure><img src="https://support.carbonforunreal.com/hubfs/Knowledge%20Base%20Import/cdn-assets.carbon.showkbcarbon-plugininterfacecarbon-menucarbon-library-overview.png" alt=""><figcaption></figcaption></figure>

*\[The library panel shows a list of assets (i.e. fixtures) you can manually add to your scene]*

## Requesting Library Assets

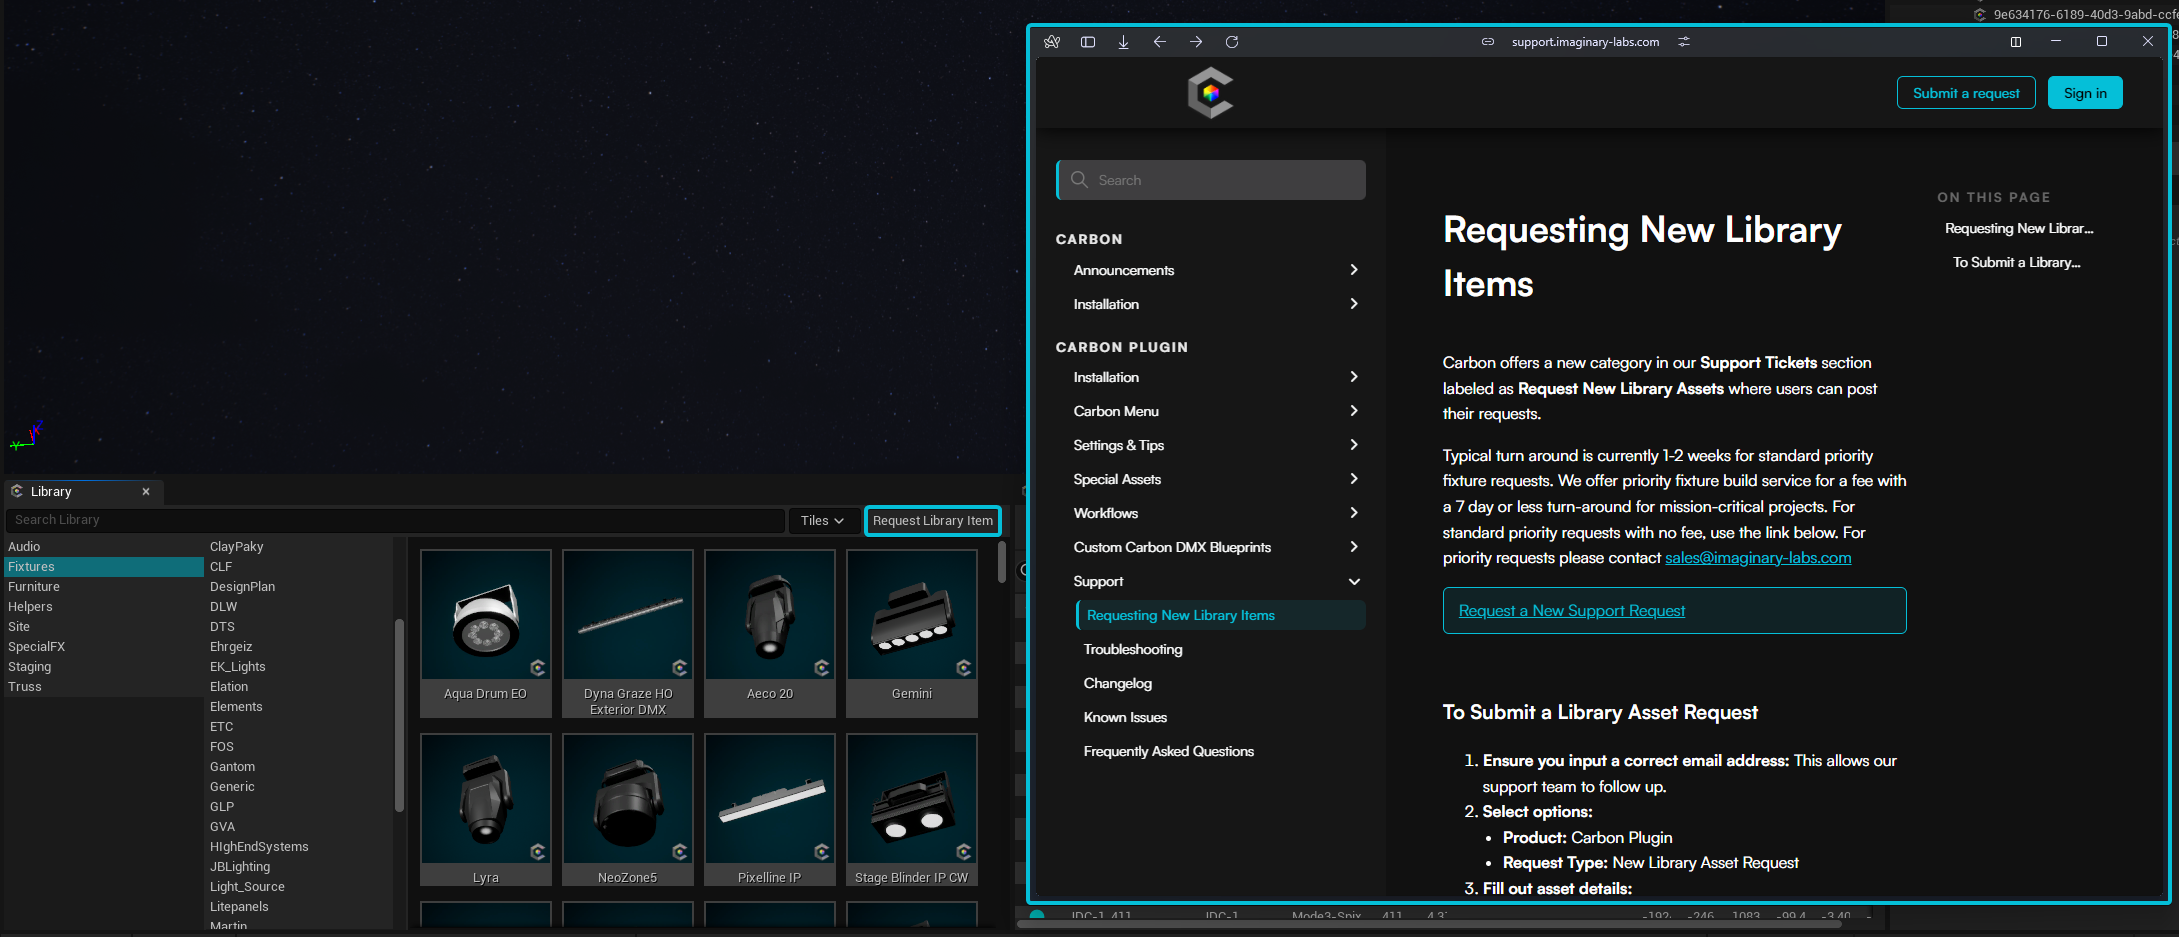
Carbon offers easy Library Requests with the **Request Library Item** button that allows you to submit requests to our developers. To do so, open the **Carbon Library Panel**. On the top-right of the Carbon Core Toolbar, you will see the button **Request Library Item** (See picture below). Clicking this will bring up our [Request a New Library Asset](https://support.carbonforunreal.com/knowledgebase/requesting-new-library-items?hsLang=en) page.

<figure><img src="https://support.carbonforunreal.com/hubfs/Knowledge%20Base%20Import/cdn-assets.carbon.showkbcarbon-plugininterfacecarbon-menurequest-library-item.png" alt=""><figcaption></figcaption></figure>


# Patch

he Patch View offers a streamlined table view for monitoring all Carbon fixtures within your scene. This view automatically populates with every Carbon fixture present in the loaded level.

## Managing Fixture Patches

To edit the patch of a fixture simply hover over the Patch column of the table for the desired fixture and press the right mouse button followed by a left click. You can then type in the corresponding patch value. The updated patch will be automatically applied to the corresponding asset in the Details panel.

All other fixture attributes can be adjusted in the patch view except for the Fixture's Model and Mode which can be changed in the Details panel. Details on fixture properties are available [here](/carbon-for-unreal/using-and-modifying-assets/fixtures).

<figure><img src="/files/mNuuXpc06P28WynxB9ls" alt=""><figcaption></figcaption></figure>

{% hint style="info" %}
The table displays comprehensive Patch Data for each fixture in your scene, including their position. Selecting a row in the table conveniently selects the corresponding fixture in both the World Outliner and the Viewport. Additionally, the "Locate Fixture" button instantly repositions the viewpoint to focus on the currently selected fixture.
{% endhint %}

## Patch Tools

The patch tab also provides access to a host of tools that allow quick fixture patch/system settings, as well as importing, exporting, and saving shows.

| [**Import Patch**](/carbon-for-unreal/menus-panels-and-tools/tools/import-patch) | Opens the “Import Patch” window for importing external CSV and MVR files                                                                                           |
| -------------------------------------------------------------------------------- | ------------------------------------------------------------------------------------------------------------------------------------------------------------------ |
| [**Auto Patch**](/carbon-for-unreal/menus-panels-and-tools/tools/autopatch-tool) | Launches the Auto Patch tool for streamlined bulk patch editing                                                                                                    |
| **Save Patch**                                                                   | Saves current in-scene fixtures to formatted csv file, which can then be re-imported using the Carbon preset in Import Patch. (currently only supports CSV export) |
| [**Export MVR**](/carbon-for-unreal/menus-panels-and-tools/tools/export-patch)   | Brings up the MVR export dialog for saving your patch as an industry standard MVR for use in consoles and other applications.                                      |
| **Reload Scene Fixtures**                                                        | Removes all instances of fixtures in the scene and replaces them. (recommended when updating Carbon version)                                                       |
| **Purge Patch**                                                                  | Removes all fixtures from the scene                                                                                                                                |


# Console

The Carbon Console Panel offers streamlined lighting control directly in Unreal, without the need for external DMX hardware. Perfect for rapidly crafting static looks and testing fixture functionality

## Using the Console

To use the Carbon Console, activate it by clicking the "Enable Console" button. The button will turn **blue** when enabled. This should be done before entering play mode.

<figure><img src="/files/odGzNQYiNFborXmjLVIv" alt=""><figcaption></figcaption></figure>

All Carbon fixtures are listed in the left column, organized by type or group. Expand groups to access and control individual fixtures. When a fixture is selected, its adjustable parameters are revealed in the main column alongside a global color wheel for supported lights. Each parameter can be controlled either by sliding the fader with your mouse, or by typing in an exact DMX value on the text field below.

{% hint style="warning" %}
**Note:** The Carbon Console will override **all** incoming DMX connections
{% endhint %}

## Console Presets

The Carbon Console simplifies the creation of static lighting looks without the need for an external console, thanks to its preset functionality.

### **Creating a Preset**

1. Adjust fixtures to your desired look using the sliders in the main column.
2. Enter a name for the preset in the text field at the top of the preset column.
3. Click "Save" to add the preset to the list.

### **Loading a Preset**

1. Select the desired preset from the list.
2. Click "Load" to apply the preset to your scene.

### **Updating a Preset**

1. Adjust fixtures to the new desired look.
2. Select the preset you wish to update.
3. Click "Update" to overwrite the existing preset with the new settings.

### **Managing Presets**

* **Rename:** Select a preset and click "Rename" to change its name.
* **Delete:** Select a preset and click "Delete" to remove it from the console.

{% hint style="danger" %}
**Warning:** Deleting a preset is irreversible.
{% endhint %}


# Carbon Settings

The Carbon Settings Panel allows dynamic controls for multiple performance and visual settings

## Modifying Settings

The Carbon Settings Panels allows you to OVERRIDE and individual default setting

{% hint style="warning" %}
**Note:** To modify a specific setting from its project default, you must check the box located on the left side of that particular parameter.
{% endhint %}

<figure><img src="/files/l0gSda7QhygR6MtPPoLX" alt=""><figcaption></figcaption></figure>

### Performance/Quality

#### **Light**

Allows control of a light's footprint parameters.

| **Footprint Resolution**            | Adjusts the overall resolution of the footprint. Will affect gobo sharpness and update speed.   |
| ----------------------------------- | ----------------------------------------------------------------------------------------------- |
| **Enable Multi Instance Footprint** | Enables the casting of light from multi-instance fixtures. **Can cause a big performance hit.** |

***

#### **Shadow**

Control the quality of a light's shadow.

**Enable All Shadows**

| **Enable All Shadows** | Enable or disable shadows globally on all fixtures |
| ---------------------- | -------------------------------------------------- |

#### **Shadow Resolution**

**Note:** Overriding the global Shadow Resolution does not work with ray-traced shadows.

| **Single Instance Shadow Resolution** | Overrides the shadow resolution of all single instance fixtures |
| ------------------------------------- | --------------------------------------------------------------- |
| **Multi Instance Shadow Resolution**  | Overrides the shadow resolution of all multi instance fixtures  |

***

#### **Beams**

Modify beam appearance.

| **Beam Density**       | Adjusts the amount of fog and smoke effects visible in beams       |
| ---------------------- | ------------------------------------------------------------------ |
| **Hotspot Mitigation** | Controls the balance between visual smoothness and light intensity |

***

#### **Beam Quality**

| **Single Instance Lights**            | Adjusts the perceived quality of the ray march for single instance fixtures with no complex gobos   |
| ------------------------------------- | --------------------------------------------------------------------------------------------------- |
| **Single Instance Lights Resolution** | Changes the overall resolution of the beam for single instance fixtures (Low, Medium, High)         |
| **Aerial Gobos**                      | Adjusts the perceived quality of the ray march for single instance fixtures that have complex gobos |
| **Aerial Gobos Resolution**           | Changes the overall resolution of the beam for complex gobo fixtures (Low, Medium, High)            |
| **Multi Instance Lights**             | Adjusts the perceived quality of the ray march for fixtures with multiple instances                 |
| **Multi Instance Lights Resolution**  | Changes the overall resolution of the beam for multi instance fixtures (Low, Medium, High)          |

{% hint style="info" %}
**Note:** Changing the beam resolution requires a restart of play mode
{% endhint %}

***

#### **Zoom Attenuation**

| **Single Instance Zoom Attenuation** | Adjusts the maximum light beam length as zoom angle increases for single instance fixtures |
| ------------------------------------ | ------------------------------------------------------------------------------------------ |
| **Multi Instance Zoom Attenuation**  | Adjusts the maximum light beam length as zoom angle increases for multi instance fixtures  |

***

#### **Smoke Texture**

Enables a complex smoke effect in light beams that creates a cloudy, hazy look.

| **Smoke Scale**      | Adjusts the size of the smoke effect across the beams                                                           |
| -------------------- | --------------------------------------------------------------------------------------------------------------- |
| **Smoke Uniformity** | Adjusts the uniformity/transparency of the smoke effect (The lower the value, the more 'hazy' the beam appears) |
| **Smoke Speed**      | Controls the speed of the smoke effect on all three axis                                                        |

{% hint style="info" %}
**Pro Tip:** Although the Smoke Uniformity Slider goes between 0-1, you can input a negative value. (do not exceed -1) For a very hazy beam look, try setting the uniformity to -0.1 or -0.2!
{% endhint %}

***

### **Simulation Settings**

Miscellaneous Settings related to simulation calculation

| **Motor Simulation**  | Enables speed calculation of Pan tilt, which can add delay during focusing. You may wish to disable for faster response while focusing lights |
| --------------------- | --------------------------------------------------------------------------------------------------------------------------------------------- |
| **Optimize Pan/Tilt** | Uses a special vertex shader on geometry which may speed up processing time for transforming static meshes on fixtures                        |

### **Camera**

Quick macro button that adds a PostProcessVolume into the scene with our recommended calibrated exposure levels.

<figure><img src="/files/7EObYsky9CvXbDAAEh2t" alt=""><figcaption></figcaption></figure>

*Our recommended exposure settings when using Carbon fixtures*

&#x20;


# Diagnostics

The Diagnostics Panel provides comprehensive information about your license, machine, and scene.

<figure><img src="/files/BBRTNOnT6KhFhCfgh1fd" alt=""><figcaption></figcaption></figure>

#### Refresh

Updates the readouts in the diagnostic panel if you make a change that is not dynamically detected

#### Copy to Clipboard

Copy the contents of the diagnostics panel into your operating system clipboard for viewing in other applications

#### Export Report

This allows you to save a .txt file which is especially helpful to our developers when you submit support tickets

#### Submit Issue

Carbon offers easy support access with the “Submit Issues” button that allows you to submit tickets to our developers.

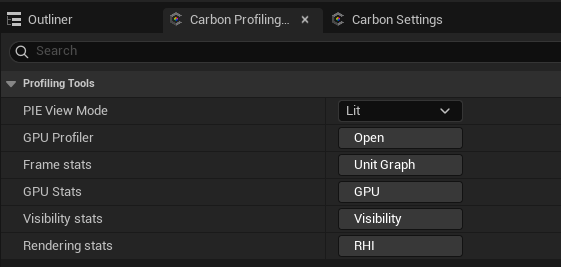
#### Profiling Tools

Opens the Carbon Profiling Panel to help with diagnosing performance issues

<img src="https://support.carbonforunreal.com/hs-fs/hubfs/profiling%20tools.png?width=561&#x26;height=267&#x26;name=profiling%20tools.png" alt="profiling tools" height="267" width="561">

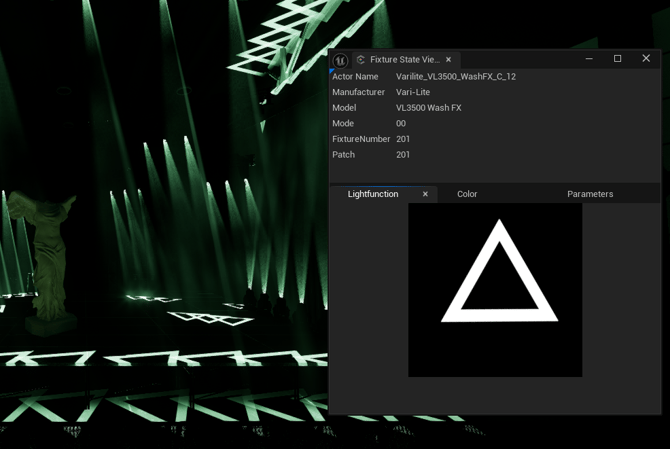
#### Fixture State

Opens the fixture state viewer. This panel displays light function and other parametric data for the selected fixture during play mode. Simply select fixtures in the outliner after initiating play.
<img src="https://support.carbonforunreal.com/hs-fs/hubfs/fixture%20state%20viewer.png?width=670&#x26;height=449&#x26;name=fixture%20state%20viewer.png" alt="fixture state viewer" height="449" width="670">


# Tools


# Import Patch

Streamline your show setup in Carbon for Unreal by importing patch and fixture data from external sources

## Using the Import Patch Tool

Carbon for Unreal has the ability to import entire shows (patch, fixture position, etc.) from a single spreadsheet (CSV) or MVR file. Using the Import Patch Tool, users can prepare a show externally, either from software like Vectorworks and GrandMA2 3D, or manually, and import that data into Carbon for Unreal.

The Import Patch Tool panel can be accessed via the Patch Panel, by pressing the "Import Patc&#x68;*"* button on the top left.
<figure><img src="/files/1zl85Cce34SoTX2ctKdu" alt=""><figcaption></figcaption></figure>

{% hint style="info" %}
The Import Patch Tool takes an imported file and parses the data to generate Carbon fixtures that will populate in the level.
{% endhint %}

## Import MVR

After exporting the .mvr file from Vectorworks (or other compatible application), it can now be imported to Unreal through Carbon. In UE5, open the Patch Panel and select the “Import Patch” button.

<figure><img src="/files/bsArWVQZJBMDIWFVSzbX" alt=""><figcaption></figcaption></figure>

A new “Import Patch” pop-up window will appear, select the “Select File” button at the top left of this window to access the file explorer. Find and open your MVR file through this explorer window and click “Open”.

<figure><img src="/files/LmAKuaItBfdzSk8u71Ay" alt=""><figcaption></figcaption></figure>

{% hint style="info" %}
The Import Settings will be automatically filled in based on the MVR data. Press the "Import" button and Carbon will automatically parse the MVR data into columns in the "Preview Data" section.
{% endhint %}

### Options

The imported data will now be transformed to Carbon compliant headers. After loading the file, all the Carbon Mappings should be automatically populated in the column headers. If any of the columns are misaligned with the MVR information, manually set the correct mapping using the dropdown menus.

### &#x20;**Associating with Carbon Assets**
Once the mapped fields have been identified, select the “Process” button in the bottom right corner of the "Preview Data" section. This will generate fields and stats of the information Carbon has translated from the template. The section entitled “Associations” is where you can assign the fixture asset and mode to the different types of lights imported from the spreadsheet. With all the Associations populated with information, use the spawn button to generate the fixtures within your scene. Once you associate a fixture in this manner, it will be remembered as the default choice for future imports within the same unreal project.

<figure><img src="/files/bVZW4sSVMQYNUgfsk0N2" alt=""><figcaption></figcaption></figure>

If successful, your fixtures should now be populated in the level at the appropriate locations based on the MVR plot. You are now free to edit them however you wish.

## Import CSV

### Preparing your Data

Carbon is able to import entire show setups from a single spreadsheet. Carbon will begin reading data from the 2nd row and below on an import spreadsheet, so column headers can be any format you choose. To create this form, you may refer to the example spreadsheet displayed below. Carbon and Unreal use the metric system of measurement, so please import measurement values in meters.

<figure><img src="/files/km9JfGVsRxsR4KVzzTRG" alt=""><figcaption></figcaption></figure>

{% hint style="info" %}
(*The spreadsheet above is one example of the format and fields you can use when importing to Carbon)*
{% endhint %}

### Importing Patch from a CSV File

After creating/saving the csv file of fixtures, it can now be imported to Unreal through Carbon. In UE5, open the Patch Panel and select the “Import Patch” button.

<figure><img src="/files/icLSVCFIMQzPIArMuvQz" alt=""><figcaption></figcaption></figure>

A new “Import Patch” pop-up window will appear, select the “Select File” button at the top left of this window to access the file explorer. Find and open your csv file through this explorer window and click "Open"

<figure><img src="/files/4wZFEwg70yiFMBts87KE" alt=""><figcaption></figcaption></figure>

### **Import Settings**

If the CSV was generated automatically from a supported preset, you can use the “Import Settings” to quickly map the column headers to the data values. Using the “Load Preset” dropdown, select the format the csv has been saved under and ensure the “Source Units” align with the default unit type of that preset.&#x20;

<figure><img src="/files/HnPPmJCpC8KASAwCzoW5" alt=""><figcaption></figcaption></figure>

Once you've selected your import settings, press the "Import" button, and Carbon will then parse the data into tables ready to generate fixtures within your scene.

*Note: Carbon defaults to “Centimeter” units, while VectorWorks defaults to “Meter” units*

### **Transforming Data**

The imported data will now be transformed to Carbon compliant headers. After loading the file, all the Carbon Mappings should be automatically populated in the column headers. If any of the columns are misaligned with the CSV information, manually set the correct mapping using the dropdown menus.

<figure><img src="/files/eFh1nuX1gvSe5w4rJXal" alt=""><figcaption></figcaption></figure>

### **Axis Setup**

The “Axis Setup” section of the Import Patch tool allows you to swap and invert axis if needed. If the data was loaded from a supported preset, this data will be updated automatically and can often be left alone.

![](https://support.carbonforunreal.com/hubfs/Knowledge%20Base%20Import/cdn-assets.carbon.showkbcarbon-pluginworkflowsimport-axis-setup.png)

### **Associating with Carbon Assets**

Once the mapped fields have been identified, select the “Process” button in the bottom right corner of the Preview Data section. This will generate fields and stats of the information Carbon has translated from the template. The section entitled “Associations” is where you can assign the fixture asset and mode to the different types of lights imported from the spreadsheet. With all the Associations populated with information, use the spawn button to generate the fixtures within your scene. Once you associate a fixture in this manner, it will be remembered as the default choice for future imports within the same unreal project.

<figure><img src="/files/PLjB0MlMYI7ffpJJ4jZF" alt=""><figcaption></figcaption></figure>

{% hint style="info" %}
*(Imported data associations are read from an imported spreadsheet that has been mapped and processed. The user can now tie mesh and mode associations with the fixtures generated.)*
{% endhint %}

If successful, your fixtures should now be populated in the world at the coordinates listed on your csv document. You are now free to edit them however you wish.


# Export Patch

You can now export patches for your design in Carbon to industry standard MVR files

From the Patch Panel, select "Export MVR" to launch the MVR export Dialog.

You will need to provide your own GDTF files which will be included in the MVR file for your fixture types. Once you have pleased them in a directory, choose that directory in Step 1.

The dialog will then scan that directory and provide a "best guess" for which GDTF to use for each fixture type detected in your scene. You may override this guess and choose one that works better for you.

<figure><img src="/files/9lOysi4Ece72SmP09NUH" alt=""><figcaption></figcaption></figure>

You may be presented with an error in the export statistics such as the following image:&#x20;

<figure><img src="/files/dOa8zcJPGbqHH2jqOBVg" alt=""><figcaption></figcaption></figure>

To correct the error, you will need to fix any duplicate fixture IDs or patches, as these will not be compliant with the file specification. Once you've corrected the errors you can export the MVR file for use in other applications.


# Autopatch Tool

Automate fixtures setup with ease using the Auto Patch Tool for efficient patching without importing show data.

## About the Autopatch Tool

Carbon for Unreal includes a convenient auto patch tool for quickly patching a large number of fixtures for situations where a scene has a large number of fixtures, but patch data was not imported from a show file or other source. The Auto Patch tool panel can be opened by clicking the Auto Patch button near the top left of the patch table in the Patch Panel.

The panel displays the number of actively selected fixtures, also the number of non-fixture items currently selected if any (non-fixture items will not affect the auto patch).

<figure><img src="/files/t2JrJC6clXMjgWi1bETP" alt=""><figcaption></figcaption></figure>

The Auto Patch panel has three tools for automatically setting up the Patch Data for the selected fixtures in your scene:

1. Update Fixture Number
2. Update Patch
3. Update Name

To use any of these tools select the “Update X” checkbox that corresponds to the desired field to be automatically assigned.

Once a given tool has been selected and its parameters have been setup, click “Apply” to automatically assign the values to the selection of fixture. Additionally, “Auto Close” may be enabled to immediately dismiss the Auto Patch panel once the “Apply” button is pressed.

{% hint style="warning" %}
Auto patch tools will be processed in order of selection.
{% endhint %}

### Fixture \#

To automatically assign fixture numbers to the selected fixtures, click the checkbox next to “Update Fixture Number”, then set the first fixture number and the increment value that each additionally selected fixture will be incremented by. (i.e. 3 selected fixtures with a First Fixture # of 100 and an increment value of 10 will set the fixture numbers to 100, 110, and 120 in order of selection).

### Patch

To automatically assign fixture numbers to the selected fixtures, click the checkbox next to “Update Patch”. Define the starting patch value for the current selection, the default is 1.1 if left blank. Set the increment to either pull the appropriate number of channels for each fixture automatically from the DMX profile of the fixture (Auto From Mode), or set a manual to define a custom increment number. Select the “Universe Autowrap” checkbox if you wish fixtures to spill into the next universe if there are more fixtures selected than can be patched into the current universe. The Autowrap dropdown defines channel start for fixtures spilling into subsequent universes, (1 by default or a manually specified start channel). If “Universe Autowrap” is not enabled and there are more fixtures than can be patched into the current universe, the remaining fixtures will not be patched.

### Actor Name

To automatically update the name of the actor of selected fixtures (as it appears in the Unreal World Outliner), click the checkbox next to “Update Name”. The name is defined with a prefix and a suffix. The default is to use the model of the fixture and the fixture number. If using the Fixture # tool to auto set the fixture number as well, the suffix will pull the new updated fixture number as set by the tool. Both the prefix and suffix values can be manually set to a user desired string.


# Transform Tools

Make quick changes to positions and rotations of objects and fixtures

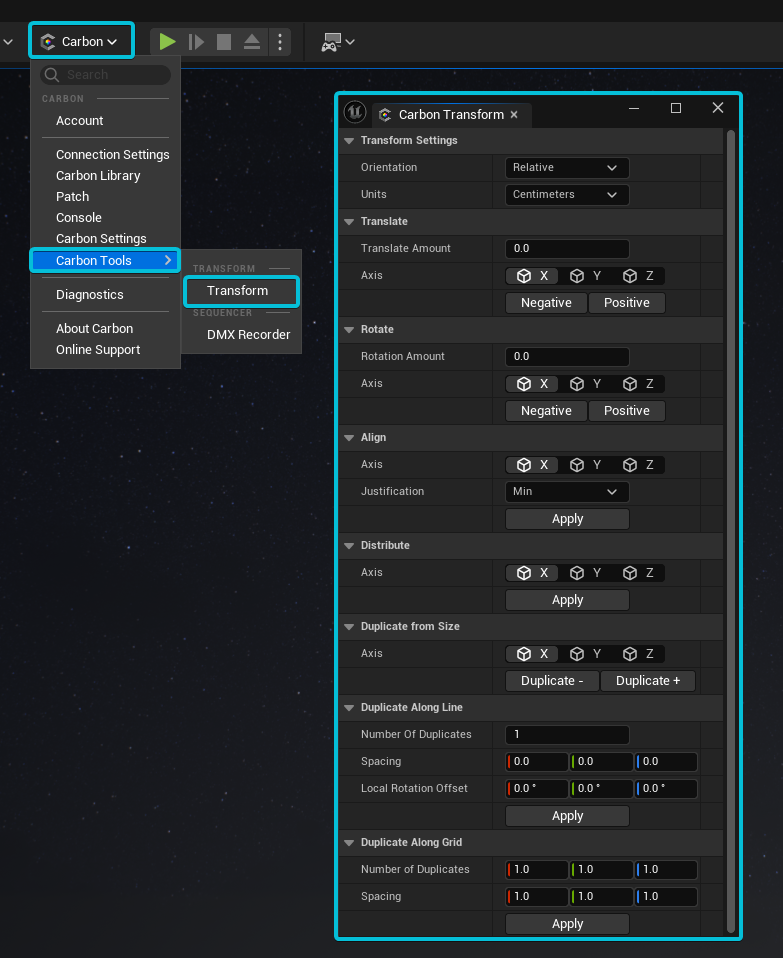
The Carbon Transform Panel allows easy adjustment to position and rotation when manually adjusting a scene. The Transform Panel supports simultaneous adjustments to multiple selected items and offers both relative and absolute transformation modes.

<figure><img src="https://support.carbonforunreal.com/hubfs/Knowledge%20Base%20Import/cdn-assets.carbon.showkbcarbon-plugininterfacecarbon-toolstransform-tools.png" alt=""><figcaption></figcaption></figure>

To use the Transform Panel, simply select an asset(s) in the viewport or outliner and all the changes made using the transform tools will apply to the selected fixture(s).

#### Transform Settings

Adjust both the orientation of the transformation (relative, global) and the selection of units (cm, m, in, ft)

#### Transform

Allows you to make detailed transform movements, alignments, and rotations at controlled intervals.

#### Align/Distribute

Allows you to control multi-fixture alignments and distributions locally to one another.

#### Duplicate Array

The duplicate array tool allows you to duplicate a selected mesh (Currently only supports Carbon assets) in an equidistant linear or grid array.


# DMX Recorder

Designed to streamline the process of setting up, recording, and playing back fixtures data using the built in Take Recorder and Sequencer.

## Introduction

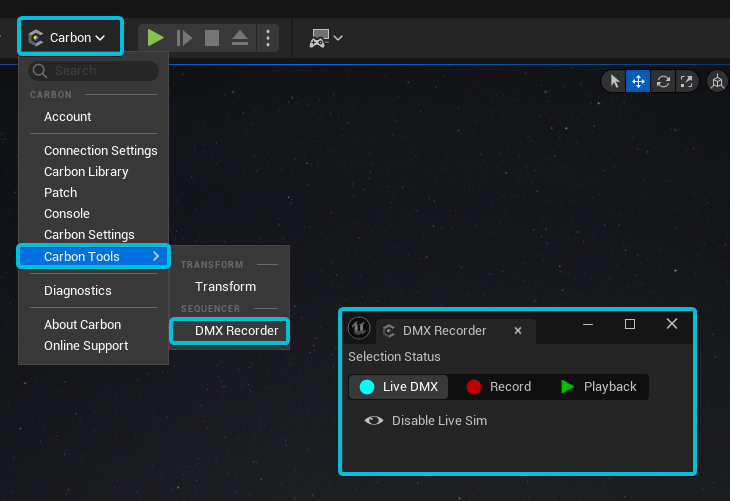
The DMX Recorder Tool consists of two sections:

* Selection Status
* Disable Live Sim

<figure><img src="https://support.carbonforunreal.com/hubfs/Knowledge%20Base%20Import/cdn-assets.carbon.showkbcarbon-plugininterfacecarbon-toolsdmx-recorder.png" alt=""><figcaption></figcaption></figure>

#### Selection Status

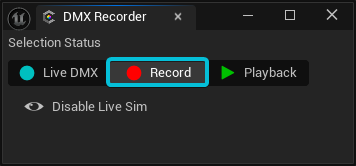
**Live DMX:** Allows the selected fixtures to be controlled by live DMX connections, and ensures the fixtures are disarmed for recording. Selecting Live DMX will also remove the selected fixtures from the Take Recorder.

**Record:** Arms the selected fixtures for Take Recorder. Clicking Record will also open the Take Recorder and Sequencer panels if not already open in the editor.

**Playback**: Preps the selected fixtures to be played back using data from the Sequencer. Fixtures that are armed for playback will not be driven by DMX connections. Disarms the fixtures for recording.

#### Disable Live Sim

Disables simulation of all GenericDMX fixtures in the scene to improve performance during recording. It is most effective in scenes with a high performance cost.

## Workflow

The UE5 Take Recorder is the recommended workflow for recording Carbon fixtures to an Sequence. Take Recorder is automatically enabled whenever Carbon is installed in a project.

{% hint style="info" %}
**Take Recorder overview:**\
<https://docs.unrealengine.com/en-US/Engine/Sequencer/Workflow/TakeRecorder/UsingTR/index.html>
{% endhint %}

{% hint style="info" %}
**UE5 Sequencer overview:**\
<https://docs.unrealengine.com/en-US/Engine/Sequencer/Overview/index.html>
{% endhint %}

Carbon for Unreal includes the DMX Recorder which makes the process of selecting fixtures in the scene, arming for record, and playing back a take simple.

The tool can be opened by clicking **DMX Recorder** on the Carbon Tools tab of the Carbon Menu.

When you launch the DMX Recorder, both the **Take Recorder** and **Sequencer** panels will open automatically.

### **Arming Fixtures for Record**

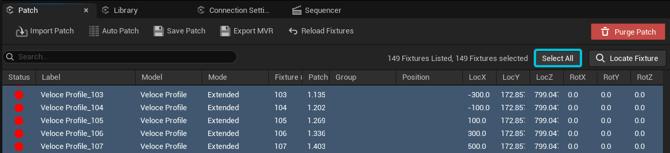
Select all the fixtures you would like to record in the level outliner or through the [Patch View.](/carbon-for-unreal/menus-panels-and-tools/panels/patch)\
\
*(You can use the **Select All** button in the Patch View to select all fixtures in scene.)*

<figure><img src="https://support.carbonforunreal.com/hs-fs/hubfs/Knowledge%20Base%20Import/Carbon-PatchView-SelectAll.png?width=670&#x26;height=154&#x26;name=Carbon-PatchView-SelectAll.png" alt=""><figcaption></figcaption></figure>

{% hint style="info" %}
**Tip:** The record mode status of fixtures is visible in the **Patch View**.
{% endhint %}

Open the DMX Recorder and toggle all selected fixtures to “Record” mode. \
\
*(For some additional performance headroom when recording, use the **Disable Live Sim** option.)*

<figure><img src="https://support.carbonforunreal.com/hs-fs/hubfs/Knowledge%20Base%20Import/Carbon-DMXRecorder-Record.png?width=356&#x26;height=166&#x26;name=Carbon-DMXRecorder-Record.png" alt=""><figcaption></figcaption></figure>

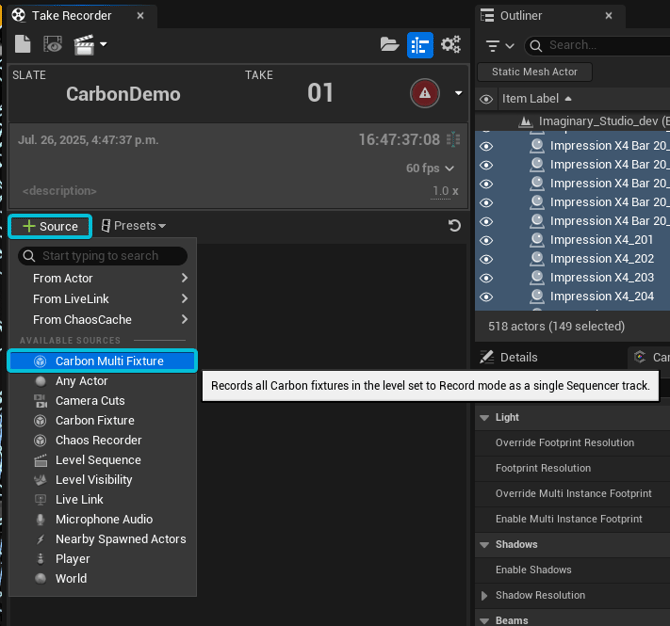
Add the **Carbon Multi Fixture Scene Recorder** to the Take Recorder.\
\
The high performance **Carbon Scene Recorder** will auto detect all armed fixtures in the scene and record onto a single sequence

<figure><img src="https://support.carbonforunreal.com/hs-fs/hubfs/Knowledge%20Base%20Import/CarbonMultiFixture.png?width=670&#x26;height=627&#x26;name=CarbonMultiFixture.png" alt=""><figcaption></figcaption></figure>

Additionally, you can add in a CineCameraActor into the Take Recorder. *(This step can also be done when editing the sequence later.)*

### **Recording a Sequence**

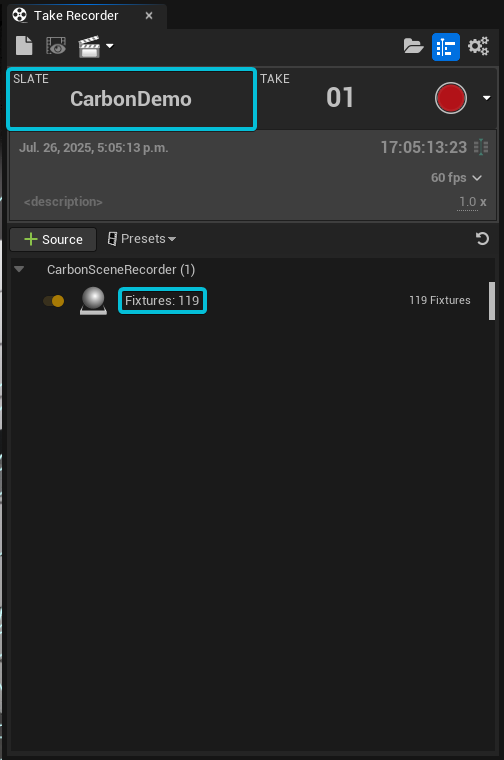
Ensure that the Carbon Scene Recorder is reading the correct number of fixtures in the Take Recorder. (*It is also recommended to name the Slate before starting a Take.*)\ <br>

<figure><img src="https://support.carbonforunreal.com/hs-fs/hubfs/Knowledge%20Base%20Import/TakeRecorder-CarbonSceneRecorder.png?width=504&#x26;height=760&#x26;name=TakeRecorder-CarbonSceneRecorder.png" alt=""><figcaption></figcaption></figure>

**Prior to recording, you must be in either Play in Editor or Simulate modes.**

Press the **red record button** in the Take Recorder to begin recording a take. Recording will begin after a three second countdown.<br>

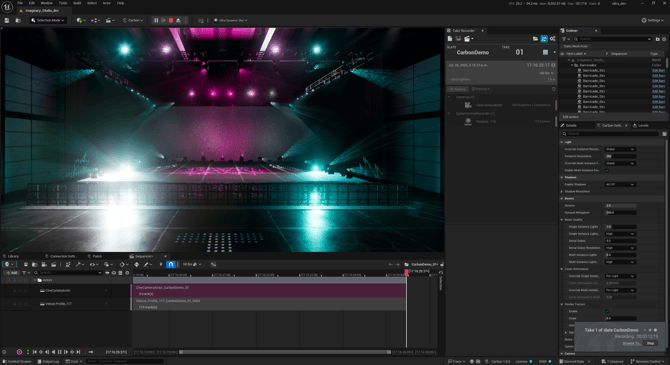
<figure><img src="https://support.carbonforunreal.com/hs-fs/hubfs/Knowledge%20Base%20Import/CarbonRecordInProgress.png?width=670&#x26;height=366&#x26;name=CarbonRecordInProgress.png" alt=""><figcaption></figcaption></figure>

Drive the fixtures from your console.

When you've finished recording your sequence, click the stop button in the Take Recorder and exit play/simulate mode.

### **Playback a Recorded Sequence**

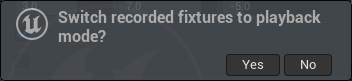
Arm fixtures for playback by selecting Yes in the bottom-right prompt that appears after ending a recording, or by using the DMX Recorder panel.<br>

<figure><img src="https://support.carbonforunreal.com/hs-fs/hubfs/Knowledge%20Base%20Import/Carbon-ArmForRecord-Prompt.png?width=352&#x26;height=81&#x26;name=Carbon-ArmForRecord-Prompt.png" alt=""><figcaption></figcaption></figure>

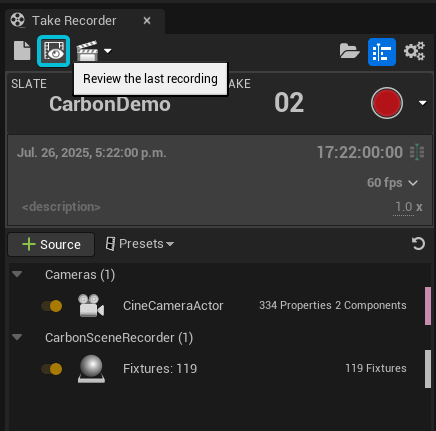
Open your recorded sequence using the **Review the last recording** button in the Take Recorder. (*You can also open a sequence within the Take Browser.)*<br>

<figure><img src="https://support.carbonforunreal.com/hs-fs/hubfs/Knowledge%20Base%20Import/TakeRecorder-ReviewRecording.png?width=436&#x26;height=431&#x26;name=TakeRecorder-ReviewRecording.png" alt=""><figcaption></figcaption></figure>

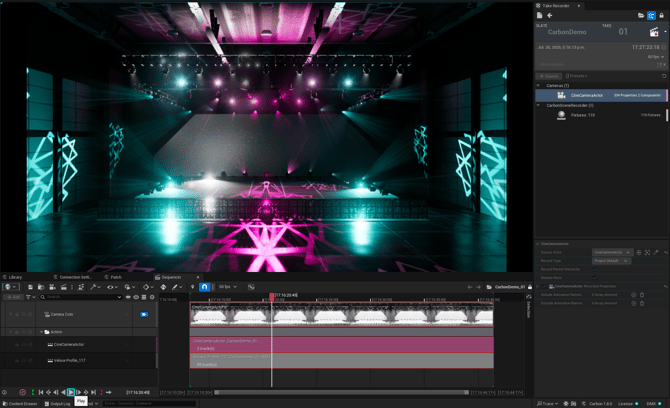
Once in play/simulate mode, use the sequence controls to playback your recorded take.<br>

<figure><img src="https://support.carbonforunreal.com/hs-fs/hubfs/Knowledge%20Base%20Import/Carbon-SequencePlayback.png?width=670&#x26;height=408&#x26;name=Carbon-SequencePlayback.png" alt=""><figcaption></figcaption></figure>

If you are not happy with the current take, simply set the recording mode to **Record** in the DMX Recorder panel and record a new take.

&#x20;

## Recording in Real-time

To record directly from the Unreal viewport, and save to disk in real-time, you can use the Off World Live Livestreaming Toolkit plugin. Follow these tutorials to learn more:

* [Off World Live - Media Output](https://knowledge.offworld.live/en/owl-toolkit-quick-guides/owl-media-output)
* [Youtube - How to live-stream direct from Unreal Engine to RTMP, RTSP, SRT or live-record to MP4,MOV,AVI,MKV](https://youtu.be/wOENhUKJRuU)


# Profiling Tools


# Fixture State Viewer


# Using and Modifying Assets


# Fixtures

## Introduction <a href="#hs_cos_wrapper_kb-article-module-3" id="hs_cos_wrapper_kb-article-module-3"></a>

Each fixture has variables and options for maximum control. By selecting a fixture in the outliner or patch view, you can make changes to any fixture in Unreal Engines "Details Panel". If this is not already visible to you, you can enable the view by clicking Window - Details.

<figure><img src="https://support.carbonforunreal.com/hubfs/Knowledge%20Base%20Import/cdn-assets.carbon.showkbcarbon-plugininterfacefixture-detailsopen-details-panel.png" alt=""><figcaption></figcaption></figure>

***

Once you have a fixture selected, you will see many sections that allow for manual control over Carbon assets.

{% hint style="info" %}
**Note**: Multiple fixtures can be selected by holding either `Ctrl` or `Shift` on your keyboard. However, modifications can only be applied per Fixture Type, meaning you can do batch editing for all selected fixtures of the same type simultaneously.
{% endhint %}

## Patch Data

![](https://support.carbonforunreal.com/hubfs/Knowledge%20Base%20Import/cdn-assets.carbon.showkbcarbon-plugininterfacefixture-detailsdetails-patch-data.png)

The first section of options pertains to the control mode and DMX patch for the fixture.

The fields labeled Fixture Number, Patch, Location, Group, and UID are automatically populated using the Import patch Dialog, or can be manually entered or overwritten here or in the patch view or by using the "autopatch" dialog.

### **Change Fixture Type**

To swap a selected fixture's type, go to its detail panel and press the "Change Type" button under Patch Data. In the Swap Fixture Type tool, select your desired fixture model and mode.

<figure><img src="https://support.carbonforunreal.com/hubfs/Knowledge%20Base%20Import/cdn-assets.carbon.showkbcarbon-plugininterfacefixture-detailsswap-fixture-type.png" alt=""><figcaption></figcaption></figure>

### **Change Fixture Mode**

To change a fixture's mode, simply select a fixture, and choose your desired mode in the dropdown list located in the Patch Data section of the details panel.

## Display

The Display section allows a user to modify how the fixture is displayed in the viewport.

<figure><img src="https://support.carbonforunreal.com/hubfs/Knowledge%20Base%20Import/cdn-assets.carbon.showkbcarbon-plugininterfacefixture-detailsfixture-display.png" alt=""><figcaption></figcaption></figure>

| **Fixture Number**          | Displays the fixture number in the scene.      |
| --------------------------- | ---------------------------------------------- |
| **Patch**                   | Shows the fixture patch in the scene.          |
| **Front Arrow**             | Indicates the front direction with an arrow.   |
| **Power Indicator**         | Indicates the rear orientation of the fixture. |
| **Hide Geometry**           | Hides the geometry of the fixture.             |
| **Shell Material Override** | Allows overriding the fixture material.        |

## Manual Control

<figure><img src="/files/AmB3sywCrqyiF8Lp8KOq" alt=""><figcaption></figcaption></figure>

{% hint style="warning" %}
Note: The manual control section allows both the aiming of a static fixture, and the control of the fixture's optics. Adjustment must be made outside of play mode.
{% endhint %}

## Accessories

Accessories can be manually added to fixtures to modify the fixture's output or functionality. Each accessory can be individually toggled and customized on a fixture group or individually.

<figure><img src="/files/0HdtPj1IwVeILwnAagOO" alt=""><figcaption></figcaption></figure>

{% hint style="warning" %}
**Note:** This section is only available for conventional fixtures
{% endhint %}

## Appearance

Optimize your Carbon projects on a fixture-by-fixture basis by customizing fixture rendering settings.

<figure><img src="/files/JIikeEb1sjzxyNQ6s1e7" alt=""><figcaption></figcaption></figure>

Every fixture type comes with default rendering settings designed to look great in your scene. However, sometimes you'll want to customize these to achieve optimal performance or reach a specific visual target for your scene.

***

These appearance settings are organized into three distinct sections: **Light**, **Beam**, and **Emissive**. Each section allows you to fine-tune a different aspect of how the fixture looks and interacts with its environment.

| **Light**    | This controls the **light footprint** cast by the fixture as it strikes surfaces.                                             |
| ------------ | ----------------------------------------------------------------------------------------------------------------------------- |
| **Beam**     | This adjusts the **volumetric contribution** of the light, making its beam visible as it interacts with particles in the air. |
| **Emissive** | This manages the **glow** emanating from the fixture's light-emitting surface.                                                |

## Custom Gobos

For lights with gobo wheels, you can override any gobo on any wheel with a custom piece of artwork.

<figure><img src="https://support.carbonforunreal.com/hubfs/Knowledge%20Base%20Import/cdn-assets.carbon.showkbcarbon-plugininterfacefixture-detailsfixture-gobo-override.png" alt=""><figcaption></figcaption></figure>

To load a custom gobo, click add array element on the desired wheel, and select the slot number to override. Drag a texture asset to the texture slot to override. This should be a black image with white or color image. There should also be at least 5 pixels from the artwork to the border, and the image should be **set to clamp**, rather than wrap or mirror.

You can also change the start insertion angle to calibrate the slot load.

<figure><img src="https://support.carbonforunreal.com/hubfs/Knowledge%20Base%20Import/cdn-assets.carbon.showkbcarbon-plugininterfacefixture-detailsgobo-texture-clamp.png" alt=""><figcaption></figcaption></figure>

{% hint style="warning" %}
*Ensure that the Image Texture has Tiling Methods set to **Clamp***
{% endhint %}


# Special Assets


# DMX Camera and Camera Manager

## Introduction

The DMX Camera has two components, a **Camera Manager** and **Camera Components**.

### DMX Camera Chart

To start, we have a chart for the DMX Camera Protocol (Pictured below).

<figure><img src="https://support.carbonforunreal.com/hubfs/Knowledge%20Base%20Import/cdn-assets.carbon.showkbcarbon-pluginspecial-assetsDMXCamera-Chart-New.png" alt=""><figcaption></figcaption></figure>

Download the DMXCamera Chart here: [DMX Camera Chart](https://cdn-assets.carbon.show/kb/carbon-plugin/special-assets/DMXCamera-Chart-New.pdf)

### Using the DMX Camera Manager

After patching your DMX Camera and Switcher in your console:

1. Navigate to the Carbon Library panel and find the DMX Camera asset under the "Helpers" category\
   \ <br>

   <figure><img src="https://support.carbonforunreal.com/hubfs/Knowledge%20Base%20Import/cdn-assets.carbon.showkbcarbon-pluginspecial-assetsdmx-camera-library.png" alt=""><figcaption></figcaption></figure>
2. Insert the DMX Camera:
   * Right-click and select "Insert into scene" (for placement at origin).
   * Alternatively, drag and drop the camera directly into the scene\ <br>
3. Verify DMX Camera Switcher:

   * The first DMX Camera added to the level will automatically instantiate the DMX Camera Switcher.<br>

     *Ensure that a DMXCameraSwitcher asset has been spawned in the level outliner*<br>

   <br>

   <figure><img src="https://support.carbonforunreal.com/hubfs/Knowledge%20Base%20Import/cdn-assets.carbon.showkbcarbon-pluginspecial-assetsdmx-camera-outliner.png" alt=""><figcaption></figcaption></figure>
4. Configure the Switcher patch:

   * Locate the DMX Camera Switcher in the outliner and set the appropriate patch in the Details panel

   <figure><img src="https://support.carbonforunreal.com/hubfs/Knowledge%20Base%20Import/cdn-assets.carbon.showkbcarbon-pluginspecial-assetsdmx-camera-switcher-patch.png" alt=""><figcaption></figcaption></figure>
5. Patch the DMX Camera(s)
   * In the details panel, you can assign the appropriate patch to each DMX Camera (16 channels)
   * The details panel also has many adjustable parameters that control the range of control

**Note:**

&#x20;

Make sure to change the Patch of the DMXCamera Manager in the Details panel to the correct channel if it wasn’t done already.

You can see from the picture below that when you move your DMXCamera to the "home" position you want, you can see a small viewport of what it will be looking at.

<figure><img src="https://support.carbonforunreal.com/hubfs/Knowledge%20Base%20Import/cdn-assets.carbon.showkbcarbon-pluginspecial-assetsDMX_Camera_Preview-1024x462.jpg" alt=""><figcaption></figcaption></figure>

In the DMXCameraManager, the Camera Manager Patch will allow you to select the various different cameras in the scene. Each camera is offset by one, so a number zero camera is actually your camera one.

Check your connection in the **Connection Panel** in the **CarbonCore Toolbar** to make sure you are receiving DMX data before proceeding.

By default on the CameraManager channel, it is set to zero. If DMX Camera Manager is at zero, the default scene camera is used. When you change it to channel one on your console, you will see that the camera snaps to your DMX Camera. Now, you will be unable to move the camera within Unreal, but you can control it through the console the camera was patched to.

#### **Movement**

In your console, you have translation for forward and back, trucking left and right, and up and down. If you switch to rotation, you can pan around, tilt your camera, and roll your camera. You also have control of the Field of View (FOV), zoom, and also the exposure settings.


# LED Tape

The LED Tape Blueprint allows you to turn any mesh into a pixel mappable LED tape.

## Insert LED Tape Blueprint into level

<figure><img src="/files/a25KDStICPczLnlsNJd5" alt=""><figcaption></figcaption></figure>

## Replace Mesh

In the details panel, replace the default mesh with your own custom mesh.

Either make a mesh in an external modelling tool like Maya or Blender, or you can use Unreal's built in modelling tools to make your own mesh.

**Note: Mesh must have UVs spread between 0 and 1 across the X-axis.**

<figure><img src="/files/3Fdd0vGc5fJNnYB7eTQO" alt=""><figcaption></figcaption></figure>

## Adjust Settings

Under the Carbon section, there are many settings that you can customize:

| **Number of Pixels** | Sets the total number of pixels (LEDs) stretched across the custom LED tape. This defines how many individual light points the tape will have. |
| -------------------- | ---------------------------------------------------------------------------------------------------------------------------------------------- |
| **Intensity**        | Controls the brightness (Emissive intensity) of the LED pixels.                                                                                |
| **Material Index**   | Specifies which material slot on the mesh applies to the LED tape. Useful if the mesh has multiple materials.                                  |
| **Color Mode**       | A checkbox to enable or disable RGBW mode. When checked, each pixel uses 4ch (RGBW), instead of the standard 3ch (RGB)                         |
| **Channel Mode**     | Choose between 8 Bit (RGB,RGBW) or 16 bit (RRGGBB, RRGGBBWW) color modes                                                                       |
| **Smoothing**        | Toggles a smoothing effect on the pixel transitions. Creates a more gradual change in pixel effects                                            |
| **Mesh**             | Allows you to specify the model that the LED tape will be applied to.                                                                          |

## Patch LED Tape

Patch LED Tape like any other Carbon fixture, either manually in details panel, or use the Auto Patch tool.

<figure><img src="/files/RGb0TTCkdEcc2GA5Drfq" alt=""><figcaption></figcaption></figure>


# User Defined Blueprints


# Variable Setup

To use DMX inside a blueprint you will need a “patch” variable to connect to our parse patch. Simply create a string variable called “patch” and make it public. You can then set the starting address to be any Universe.DMX. This can then be accessed within the blueprint and attached to our data stream nodes.

<figure><img src="https://support.carbonforunreal.com/hubfs/Knowledge%20Base%20Import/cdn-assets.carbon.showkbcarbon-plugincustom-carbon-dmx-blueprintsbp-patch-variable.png" alt=""><figcaption></figcaption></figure>

&#x20;

Alternatively, you can start by building a blueprint with a GenericDMX parent class, which includes the variable already.

<figure><img src="https://support.carbonforunreal.com/hubfs/Knowledge%20Base%20Import/cdn-assets.carbon.showkbcarbon-plugincustom-carbon-dmx-blueprintsgeneric-dmx-parent-class.png" alt=""><figcaption></figcaption></figure>

&#x20;

If you have already created the blueprint, you can update the parent class by selecting class settings in the BP Editor, and using the dropdown.

<figure><img src="https://support.carbonforunreal.com/hubfs/Knowledge%20Base%20Import/cdn-assets.carbon.showkbcarbon-plugincustom-carbon-dmx-blueprintsbp-reparent-genericDMX.png" alt=""><figcaption></figcaption></figure>


# Blueprint Nodes

Carbon has several built-in blueprint nodes to facilitate drive many different parameters in a custom blueprint with DMX easily. Common use cases include translating actors, adjust material parameters (i.e. Color), triggering particle systems, and much more. See our [BP Snippets](/carbon-for-unreal/using-and-modifying-assets/user-defined-blueprints/usage-examples) for premade examples of common DMX node networks. Nodes are grouped together in the "Carbon DMX" category of blueprint nodes.

&#x20;

### **Parse Patch**

Splits well formatted incoming patch string into separate Universe and Channel integer values.

<figure><img src="https://support.carbonforunreal.com/hubfs/Knowledge%20Base%20Import/cdn-assets.carbon.showkbcarbon-plugincustom-carbon-dmx-blueprintsparse-patch.png" alt=""><figcaption></figcaption></figure>

&#x20;

### **Get DMX as Integer**

Get the value of the DMX patch address and return as an integer.\
Supports 16-bit mode, channel offset, and a Min and Max range for remapping the DMX value to arbitrary output range of values (Defaults to 0-255).

<figure><img src="https://support.carbonforunreal.com/hubfs/Knowledge%20Base%20Import/cdn-assets.carbon.showkbcarbon-plugincustom-carbon-dmx-blueprintsGet-DMX-as-Integer.png" alt=""><figcaption></figcaption></figure>

&#x20;

### **Get DMX as Boolean (trigger)**

Treat the DMX patch address as a trigger channel. By default, outputs TRUE when channel value is greater than or equal to 127.\
Supports 16-bit mode, channel offset, and a custom threshold if a different value is desired for the channel to be considered triggered (TRUE).

<figure><img src="https://support.carbonforunreal.com/hubfs/Knowledge%20Base%20Import/cdn-assets.carbon.showkbcarbon-plugincustom-carbon-dmx-blueprintsget-as-boolean.png" alt=""><figcaption></figcaption></figure>

&#x20;

### **Get DMX as Float**

Get the value of the DMX patch address and return as a floating point (decimal) number. By default, outputs a decimal from 0.0 - 1.0.\
Supports 16-bit mode, channel offset, and a Min and Max range for remapping the DMX value to arbitrary output range of decimal values (Defaults to 0.0-1.0).

<figure><img src="https://support.carbonforunreal.com/hubfs/Knowledge%20Base%20Import/cdn-assets.carbon.showkbcarbon-plugincustom-carbon-dmx-blueprintsget-as-float.png" alt=""><figcaption></figcaption></figure>

&#x20;

### **Get DMX as Vector**

Get the value of the DMX patch address and the next two channels (3 channels 8-bit, 6 channels 16-bit) return as a 3 dimensional vector (of floats) value. No default range is defined, user must define what range each component of the vector will have.\
Supports 16-bit mode (fine channel is consecutive to the coarse channel), channel offset, and a Min and Max range for remapping the 3 DMX channels' values to arbitrary output range of decimal values for each component of the vector (X,Y,Z).\
TIP: Vector is convenient to use for any situation when a 3-tuple of values is needed, including translation, Euler rotation, combined RGB, etc. For sequencer recording it is recommended to use a Vector as the storage variable for any RGB color.

<figure><img src="https://support.carbonforunreal.com/hubfs/Knowledge%20Base%20Import/cdn-assets.carbon.showkbcarbon-plugincustom-carbon-dmx-blueprintsget-as-vector.png" alt=""><figcaption></figcaption></figure>

&#x20;

### **Get DMX as Scaled Linear Color**

Scale a Color by the percentage value of the DMX patch's value. i.e. Acts as an intensity channel for the specified Color value, channel value of 0 produces black, channel value of full outputs the color specified. Intermediate colors output a linearly interpolated value in-between.\
Supports 16-bit mode, channel offset, defining a custom color to scale, and inverting the scaling (i.e. 0 outputs full intensity color, full outputs black).\
TIP: Use four nodes to map arbitrary color channels (i.e. R+G+B+Amber), then add the outputs for a custom DMX Color Mix functionality.

<figure><img src="https://support.carbonforunreal.com/hubfs/Knowledge%20Base%20Import/cdn-assets.carbon.showkbcarbon-plugincustom-carbon-dmx-blueprintsget-as-linear-color.png" alt=""><figcaption></figcaption></figure>


# Usage Examples

The following are some examples of common ways to use the Carbon DMX blueprint nodes to build out functionality. These examples, and more, are available within the Carbon library helpers section.

### **DMX Single Shot Trigger**

Single shot triggers are useful for actions that need to happen only once when a trigger happens. For example a particle system aerial pyro hit. Combine the Get DMX as Boolean (trigger) node with a Branch and Do Once node, to build a single shot trigger that can trigger a particle system only once whenever the DMX value reaches 127 or above, for effects that should only happen once ever during play mode disconnect the False to Reset line so the trigger doesn't reset when the DMX value drops below 127.

<figure><img src="https://support.carbonforunreal.com/hubfs/Knowledge%20Base%20Import/cdn-assets.carbon.showkbcarbon-plugincustom-carbon-dmx-blueprintssingleshot-example.png" alt=""><figcaption></figcaption></figure>

&#x20;

### **DMX as a Rotation Value**

Using the Get DMX as Float, and a custom min and max value, building rotation functionality to rotate an object in a scene is simple. Rotation, translation, and other transformation type flows are great for building custom automation pieces and controlling them with DMX. Place the Get DMX as Float node and use the bottom arrow to expand the advanced settings of the node. Set the min and max to the desired rotation angle limits (in this example negative 60 degrees and positive 60 degrees), connect the patch, and use the output to control the relative rotation of an Actor. The actor will rotate between negative and positive 60 degrees from its initial placement as the DMX fader moves from 0 to full. TIP: For smoother transformations, enable Sixteen Bit, and control with a coarse and fine channel.

<figure><img src="https://support.carbonforunreal.com/hubfs/Knowledge%20Base%20Import/cdn-assets.carbon.showkbcarbon-plugincustom-carbon-dmx-blueprintsfloat-as-rotation-angle-example.png" alt=""><figcaption></figcaption></figure>

&#x20;

### **DMX Color Mix**

There are many ways to set up a custom color mix with Carbon DMX blueprint nodes. Here is one possible example using Get DMX as Scaled Linear Color. Place three Get DMX as Scaled Linear Color nodes, and set the colors to Red, Green, and Blue. Connect the patch, and increment the Offset value so the Green node has offset 1 and Blue node has offset 2, this will place the G and B channels automatically after the Red value (offset 0 is the address of the Patch). Add the output values of the three nodes and use the sum to drive a color material parameter of an actor.

<figure><img src="https://support.carbonforunreal.com/hubfs/Knowledge%20Base%20Import/cdn-assets.carbon.showkbcarbon-plugincustom-carbon-dmx-blueprintsRGB-color-mix-example.png" alt=""><figcaption></figcaption></figure>

&#x20;

### **More Examples (BP Snippets)**

Carbon has pre-made node snippets for commonly used DMX flows in the DMX "BP Snippets" Blueprint which can be found in the Carbon Library under helpers.

<figure><img src="https://support.carbonforunreal.com/hubfs/Knowledge%20Base%20Import/cdn-assets.carbon.showkbcarbon-plugincustom-carbon-dmx-blueprintsbp-snippets-library-location.png" alt=""><figcaption></figcaption></figure>

&#x20;

Open the Event Graph to view the snippets, by right clicking the BP Snippets in the library and selecting “Edit BP”. Node examples can be freely copied to user made blueprints to help build functionality in Carbon projects.

<figure><img src="https://support.carbonforunreal.com/hubfs/Knowledge%20Base%20Import/cdn-assets.carbon.showkbcarbon-plugincustom-carbon-dmx-blueprintsbp-snippets-edit.png" alt=""><figcaption></figcaption></figure>


# Usage with Take Recorder

### Introduction

This article will cover how to make a user-made blueprint DMX controllable with Carbon's DMX system, and also explain how to setup Blueprint variables that can be recorded with Take Recorder and played back with the Unreal Engine Sequencer.

{% hint style="info" %}
Video Tutorial available on Youtube

[**DMX Controllable and Sequencer Compliant Blueprints Video**](https://www.youtube.com/watch?v=LZKFZdaOxtU)
{% endhint %}

Open up the blueprint you want to control with the Carbon for Unreal DMX system.

<figure><img src="https://support.carbonforunreal.com/hubfs/Knowledge%20Base%20Import/cdn-assets.carbon.showkbcarbon-plugincustom-carbon-dmx-blueprints1-open-the-light-blueprint-new.png" alt=""><figcaption></figcaption></figure>

In this example we will be controlling the IES Intensity Scale using DMX to control the brightness of a simple Spot Light component. To do this, we will be using the two custom Tick functions that come with the Generic DMX parent class.

### Class Settings

If your blueprint is not already a child-class of Generic DMX, you can navigate to Class Settings.

<figure><img src="https://support.carbonforunreal.com/hubfs/Knowledge%20Base%20Import/cdn-assets.carbon.showkbcarbon-plugincustom-carbon-dmx-blueprints2-select-class-settings-new.png" alt=""><figcaption></figcaption></figure>

Change the Parent Class to Generic DMX (if it wasn’t already selected).

<figure><img src="https://support.carbonforunreal.com/hubfs/Knowledge%20Base%20Import/cdn-assets.carbon.showkbcarbon-plugincustom-carbon-dmx-blueprints3-Select-Generic-DMX-New.png" alt=""><figcaption></figcaption></figure>

### Event Graph Setup

Once you do this, you have access to the **Event Live Tick**. Add the **Live Tick** function to the Event Graph using the functions override dropdown. The **Event Live Tick** runs when the blueprint is in its normal state.

<figure><img src="https://support.carbonforunreal.com/hubfs/Knowledge%20Base%20Import/cdn-assets.carbon.showkbcarbon-plugincustom-carbon-dmx-blueprints4-Click-Live-Tick-New.png" alt=""><figcaption></figcaption></figure>

Then, add the **Event Sequencer Tick** function to the Event Graph. The **Event** **Sequencer Tick** only runs when the blueprint's Use Sequencer checkbox is enabled in the Simulation section of the details panel. Enabling Use Sequencer disables **Event Live Tick**.

<figure><img src="https://support.carbonforunreal.com/hubfs/Knowledge%20Base%20Import/cdn-assets.carbon.showkbcarbon-plugincustom-carbon-dmx-blueprints5-Then-add-the-Sequencer-Tick-New.png" alt=""><figcaption></figcaption></figure>

Now, let’s set up DMX control. We will drag the component we want to control into the Event Graph.

<figure><img src="https://support.carbonforunreal.com/hubfs/Knowledge%20Base%20Import/cdn-assets.carbon.showkbcarbon-plugincustom-carbon-dmx-blueprints6-Drag-light-into-the-Event-Graph-New.png" alt=""><figcaption></figcaption></figure>

In this example we are controlling the IES Intensity Scale of our Spot Light component. We will drag from the light node and search for **Set IES Intensity Scale**.

<figure><img src="https://support.carbonforunreal.com/hubfs/Knowledge%20Base%20Import/cdn-assets.carbon.showkbcarbon-plugincustom-carbon-dmx-blueprints7-Set-IES-Intensity-Scale-New.png" alt=""><figcaption></figcaption></figure>

**Set IES Intensity Scale** takes a Float for its New Value. We need to get our DMX as a float value to control this parameter. Right-click on the Event Graph background to search for the function **Get DMX as Float**.

<figure><img src="https://support.carbonforunreal.com/hubfs/Knowledge%20Base%20Import/cdn-assets.carbon.showkbcarbon-plugincustom-carbon-dmx-blueprints8-Get-DMX-As-Float-New.png" alt=""><figcaption></figcaption></figure>

Connect the **Get DMX as Float** function output **Return Value** to **New Value** of the **Set IES Intensity Scale**.

<figure><img src="https://support.carbonforunreal.com/hubfs/Knowledge%20Base%20Import/cdn-assets.carbon.showkbcarbon-plugincustom-carbon-dmx-blueprints9-Connect-GetDMXasFloat-to-Set-IES-Intensity-Scale-New.png" alt=""><figcaption></figcaption></figure>

Change the Out Max value of **Get DMX as Float** to 0.002, which will take the channel's value and remap it between the Out Min and Out Max values. In this case 0 - 0.002 for our IES Intensity Scale

Drag off from **Patch** (on the **Get DMX as Float** function) and search for **Get Patch** to get the built-in patch value of the Generic DMX parent class. You can set this patch in the details panel of the blueprint instance in your scene.

<figure><img src="https://support.carbonforunreal.com/hubfs/Knowledge%20Base%20Import/cdn-assets.carbon.showkbcarbon-plugincustom-carbon-dmx-blueprints10-Get-Generic-DMX-Patch.png" alt=""><figcaption></figcaption></figure>

If you have a blueprint that needs more than one channel of control, you can add multiple **Get DMX as Float nodes**. Make sure to change the Offset for each of them, 0 offset is the channel of the Patch, positive Offset values will get subsequent channels. If any parameters are Sixteen Bit with sequential course and fine channels, you can enable that option.

Connect the execution line from **Event Live Tick** to **Set IES Intensity Scale** to finish the **Event Live Tick**.

<figure><img src="https://support.carbonforunreal.com/hubfs/Knowledge%20Base%20Import/cdn-assets.carbon.showkbcarbon-plugincustom-carbon-dmx-blueprints11.5-Connect-Execution-Line-New.png" alt=""><figcaption></figcaption></figure>

With these nodes connected (see picture below), as the **Event Live Tick** runs it is going to set the IES Intensity Scale based on the DMX value of our patch in Play Mode. This Blueprint is now DMX controllable with the Carbon for Unreal DMX system. If you do not need recording and sequencer capabilities (i.e. you are only visualizing live DMX data) you can stop here.

<figure><img src="https://support.carbonforunreal.com/hubfs/Knowledge%20Base%20Import/cdn-assets.carbon.showkbcarbon-plugincustom-carbon-dmx-blueprints11-Completed-Event-Live-Tick_New.png" alt=""><figcaption></figcaption></figure>

### Setting up recordable variables

To record this value for playback in the Sequencer, we need to create a variable that is exposed to the Unreal Engine cinematics system.

<figure><img src="https://support.carbonforunreal.com/hubfs/Knowledge%20Base%20Import/cdn-assets.carbon.showkbcarbon-plugincustom-carbon-dmx-blueprints12-Adding-a-Variable-to-expose-to-cinematics-New.png" alt=""><figcaption></figcaption></figure>

&#x20;

For our example will make a new variable of type Float, and name it something relevant (we chose Intensity).

<figure><img src="https://support.carbonforunreal.com/hubfs/Knowledge%20Base%20Import/cdn-assets.carbon.showkbcarbon-plugincustom-carbon-dmx-blueprints13-Change-Variable-to-Float-New.png" alt=""><figcaption></figcaption></figure>

Check the boxes next to **Instance Editable** and **Expose to Cinematics** in the new variable's detail panel. Both are required to allow this value to be recorded.

<figure><img src="https://support.carbonforunreal.com/hubfs/Knowledge%20Base%20Import/cdn-assets.carbon.showkbcarbon-plugincustom-carbon-dmx-blueprints14-Check-Instance-Editable-and-Expose-to-Cinematics-New.png" alt=""><figcaption></figcaption></figure>

Drag the variable on to the Event Graph, and choose **Set \[Variable Name]** (in this case **Set Intensity**).

<figure><img src="https://support.carbonforunreal.com/hubfs/Knowledge%20Base%20Import/cdn-assets.carbon.showkbcarbon-plugincustom-carbon-dmx-blueprints15-Drag-variable-into-event-graph-New.png" alt=""><figcaption></figcaption></figure>

Connect **Event Live Tick’s** Execution Output to the variable’s Execution Input of SET, then the Execution Output of SET to the Execution Input of **Set IES Intensity Scale.**

<figure><img src="https://support.carbonforunreal.com/hubfs/Knowledge%20Base%20Import/cdn-assets.carbon.showkbcarbon-plugincustom-carbon-dmx-blueprints16-Connect-the-variable-to-event-live-tick-New.png" alt=""><figcaption></figcaption></figure>

Make sure to connect the **Return Value** of **Get DMX as Float** to the Intensity variable, and connect the Intensity variable to the input of **New Value** on the **Set IES Intensity Scale** function.

<figure><img src="https://support.carbonforunreal.com/hubfs/Knowledge%20Base%20Import/cdn-assets.carbon.showkbcarbon-plugincustom-carbon-dmx-blueprints16.5-Connect-the-variable-to-event-live-tick-New.png" alt=""><figcaption></figcaption></figure>

The value of IES Intensity Scale will now be captured by the Take Recorder when recording.

Now, on to the **Event Sequencer Tick**. When we are playing back recorded data from the sequencer we do not want to be using live data from our DMX connection. Instead, we want to use the values stored in the variable. Grab another copy of the variable (Intensity), and drag in to the Event Graph. Choose **Get \[Variable Name]**, as the sequencer will be controlling this variable during playback. For this example will add another copy of Set IES Intensity Scale and the target component, and connect them all together; execution line from Sequencer Tick to Set IES Intensity Scale, component to target, and our variable to New Value.

![](https://support.carbonforunreal.com/hubfs/Knowledge%20Base%20Import/cdn-assets.carbon.showkbcarbon-plugincustom-carbon-dmx-blueprints17-Event-Sequencer-Tick-with-nodes-connected-New.png)

As the Intensity value changes during sequencer playback it will use the Sequencer Tick instead of Live Tick and update the **IES Intensity Scale** based on the recorded values of our variable.

**Congratulations, you have successfully made a blueprint that is DMX controllable and and DMX Recorder compliant!**


# Settings and Tips


# Computer Settings

## Computer Settings <a href="#hs_cos_wrapper_kb-article-module-3" id="hs_cos_wrapper_kb-article-module-3"></a>

### Registry Settings

While we don't usually encourage making changes to your computer's registry, there is one setting that may improve stability with Unreal Engine. Since Unreal uses lots of GPU resources, there are times the computer will think the card has been "ejected" or "crashed".

&#x20;

If a GPU crash is thrown, you will be met with the following error dialog:

![](https://support.carbonforunreal.com/hubfs/Knowledge%20Base%20Import/cdn-assets.carbon.showkbcarbon-pluginsettings-and-tipsue-gpu-crash-message.png)

&#x20;

To prevent this issue, please add the following registry entry using these steps:

1. **Open Registry Editor:**
   * Press `Win + R`, type `regedit`, and press `Enter`.
2. **Navigate to GraphicsDrivers:**
   * Go to `Computer\HKEY_LOCAL_MACHINE\SYSTEM\CurrentControlSet\Control\GraphicsDrivers`.
3. **Add a New DWORD Value:**
   * Right-click on the right pane, select `New` > `DWORD (32-bit) Value`.
4. **Name the Value:**
   * Enter `TdrDelay` as the value name.
5. **Set the Value Data:**
   * Double-click the new `TdrDelay` entry, enter `60` as the value data, ensure that Base is set to `Decimal`, and click `OK`.
6. **Close Registry Editor:**
   * Exit the Registry Editor to save changes.

![](https://support.carbonforunreal.com/hubfs/Knowledge%20Base%20Import/cdn-assets.carbon.showkbcarbon-pluginsettings-and-tipsreg-edit-graphics-drivers.png)![](https://support.carbonforunreal.com/hubfs/Knowledge%20Base%20Import/cdn-assets.carbon.showkbcarbon-pluginsettings-and-tipstdr-delay.png)

### Firewall Bypass

When working with Carbon for Unreal, you may be required to allow a specific internet adapter through the firewall.

#### Windows Defender Firewall

To make it easier to identify your network adapters during this process, you should rename them. Go to **Control Panel > Network and Sharing Center > Change Adapter Settings**, then right-click on the adapter and select "Rename."

<figure><img src="/files/7atEmWcWBXDDj4nRjdy4" alt=""><figcaption></figcaption></figure>

From the Windows Defender Firewall menu in the Control Panel, click **"Advanced Settings"** on the far left.<br>

<figure><img src="https://support.carbonforunreal.com/hubfs/Knowledge%20Base%20Import/cdn-assets.carbon.showkbcarbon-pluginsettings-and-tipsfirewall-home.png" alt=""><figcaption></figcaption></figure>

In the "Windows Defender Firewall with Advanced Security" window that opens, click **"Properties"** under the Actions panel on the right.

<figure><img src="https://support.carbonforunreal.com/hubfs/Knowledge%20Base%20Import/cdn-assets.carbon.showkbcarbon-pluginsettings-and-tipsfirewall-properties.png" alt=""><figcaption></figcaption></figure>

Under each of the three profiles (Domain Profile, Private Profile, and Public Profile) at the top, click the **"Customize"** button next to "Protected network connections."

<figure><img src="https://support.carbonforunreal.com/hubfs/Knowledge%20Base%20Import/cdn-assets.carbon.showkbcarbon-pluginsettings-and-tipsfirewall-customize.png" alt=""><figcaption></figcaption></figure>

Finally, **disable the network adapter(s)** that you want to allow full access through the firewall.

<figure><img src="https://support.carbonforunreal.com/hubfs/Knowledge%20Base%20Import/cdn-assets.carbon.showkbcarbon-pluginsettings-and-tipsfirewall-protected-connections.png" alt=""><figcaption></figcaption></figure>


# Unreal Engine Settings

We've accumulated a number of settings that work well with Carbon Projects.

## **Initial Project Settings**

* Game-Blank-Blueprint-Raytracing On

<figure><img src="https://support.carbonforunreal.com/hubfs/Knowledge%20Base%20Import/cdn-assets.carbon.showkbcarbon-pluginsettings-and-tipsUnrealEditor_ijodDqRaFJ1.jpg" alt=""><figcaption></figcaption></figure>

## **Editor Settings**

### **Performance**

* Show Frame Rate and Memory. Enable
* Use Less CPU when in Background, Disable.

<figure><img src="https://support.carbonforunreal.com/hubfs/Knowledge%20Base%20Import/cdn-assets.carbon.showkbcarbon-pluginsettings-and-tipsUnrealEditor_OQH2nd2Nzd1.png" alt=""><figcaption></figcaption></figure>

## **Project Settings**

### **Supported Platforms**

* Disable all but Windows 64-bit (reduces shader permutations)

<figure><img src="https://support.carbonforunreal.com/hubfs/Knowledge%20Base%20Import/cdn-assets.carbon.showkbcarbon-pluginsettings-and-tipsUnrealEditor_Qo3fSVJLT61.png" alt=""><figcaption></figcaption></figure>

### **Platforms - Windows**

* Default RHI- DirectX 12

<figure><img src="https://support.carbonforunreal.com/hubfs/Knowledge%20Base%20Import/cdn-assets.carbon.showkbcarbon-pluginsettings-and-tipsUnrealEditor_A3gkr0kimj1.png" alt=""><figcaption></figcaption></figure>

### **Engine - Rendering**

* Support Hardware Ray Tracing, Enable

<figure><img src="https://support.carbonforunreal.com/hubfs/Knowledge%20Base%20Import/cdn-assets.carbon.showkbcarbon-pluginsettings-and-tipsUnrealEditor_SH1i8qvHOb1.png" alt=""><figcaption></figcaption></figure>

* Allow Static Lighting, uncheck (unless you intend to bake lighting)

<figure><img src="https://support.carbonforunreal.com/hubfs/Knowledge%20Base%20Import/cdn-assets.carbon.showkbcarbon-pluginsettings-and-tipsUnrealEditor_03hHXFBQAd1.png" alt=""><figcaption></figcaption></figure>

* Auto Exposure, Disable
* Motion Blur, Disable
* Anti-Aliasing Method - Temporal Anti-Aliasing (TAA)
* Light Units - Lumens

<figure><img src="https://support.carbonforunreal.com/hubfs/Knowledge%20Base%20Import/cdn-assets.carbon.showkbcarbon-pluginsettings-and-tipsUnrealEditor_lx7PwQkc6c1.png" alt=""><figcaption></figcaption></figure>

### **Engine - General Settings**

* Use Fixed Framerate, uncheck unless using for XR Productions. Follow advice from XR plugin otherwise.

<figure><img src="https://support.carbonforunreal.com/hubfs/Knowledge%20Base%20Import/cdn-assets.carbon.showkbcarbon-pluginsettings-and-tipsUnrealEditor_Z7bk8cvDJd1.png" alt=""><figcaption></figcaption></figure>

### Post Process Volume Settings

**Lumen Global Illumination:**

* Lumen Scene Detail - 4
* Lumen Scene Lighting Update Speed - 4
* Final Gather Lighting Update Speed - 4

![](https://support.carbonforunreal.com/hubfs/Knowledge%20Base%20Import/cdn-assets.carbon.showkbcarbon-pluginsettings-and-tipsUnrealEditor_1LaQNP0tu91.png)


# Common Issues and Solutions

<details>

<summary><strong>Crash when launching project with Carbon</strong></summary>

Ensure that the Unreal project is not installed in a shared storage folder (e.g. Dropbox, OneDrive)

</details>

<details>

<summary><strong>Crash when disabling Ndisplay</strong></summary>

This is a known bug from Epic Games, but we have a procedure to repair your project after disabling Ndisplay.

* Open your Unreal project folder in a file explorer window and navigate to the "Config" folder.
* Delete the "Windows" folder.
* Re-open Unreal.

For future projects we recommend using project template Game-Blank

</details>

<details>

<summary><strong>Fixtures may not function correctly after an update.</strong></summary>

Unreal levels may hold onto cached versions of old Blueprints. To re-assert fixtures using the new version of the fixture, hit "reload fixtures" in the patch panel.<br>
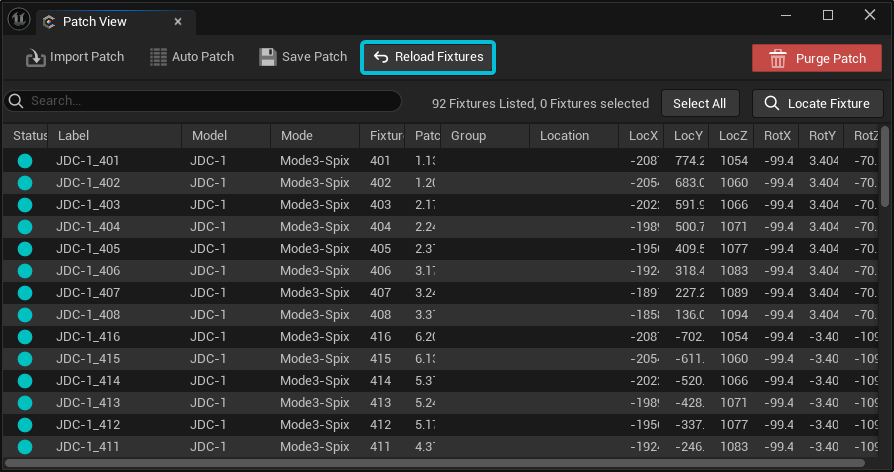
<figure><img src="https://support.carbonforunreal.com/hubfs/Knowledge%20Base%20Import/cdn-assets.carbon.showkbcarbon-pluginsupportpatch-reload-fixtures.png" alt=""><figcaption></figcaption></figure>

</details>

<details>

<summary><strong>I can't see the Light or Beam</strong></summary>

1. First make sure that your DMX Connection is activated and you can see fixtures pan and tilt.
2. If you can't see the light hitting surfaces, **Check Engine Scalability Settings:**
   * Shadows must be set to medium or up for our light functions
3. Check your exposure settings to see if you see standard moving spotlights in unreal
4. If you can't see a beam, check collisions on the meshes in your scene. If the beam shadow mode is set to "Occlusion", collisions are used to detect when a beam hits an object and cuts the beam.

</details>

<details>

<summary><strong>I am not seeing an artnet or SACN connection</strong></summary>

1. Confirm you have an active artnet or SACN stream using a tool such as [The Artnetominator](https://www.lightjams.com/artnetominator/)  or [SACN View](https://sacnview.org/)
2. These tools should be closed when you start unreal, as these protocols sometimes need exclusive port access
3. Confirm the network connection being used has no firewall enabled. We have an excellent guide on disabling firewall properly on an entire network adapter port.

</details>

<details>

<summary><strong>Color wheels do not show split colors or continuous rotation.</strong></summary>

We are adding this functionality in a future version of Carbon for Unreal.

</details>

<details>

<summary><strong>Corner pin framing shutters are not supported.</strong></summary>

We currently only support insertion/rotation framing shutter mode. Corner pin framing shutter functionality is coming in the next major release.

</details>

<details>

<summary><strong>Multi-color gobos render as greyscale.</strong></summary>

This will be supported when Megalights is no longer a beta feature

</details>

<details>

<summary><strong>DMX data pauses when not in play mode.</strong></summary>

To ensure proper functionality, DMX recording must always be done in Play mode. Remember to switch recording modes only when Play mode is stopped.

</details>

<details>

<summary><strong>grandMA3 viz-key is not supported with custom blueprints.</strong></summary>

This is due to current security restrictions with the viz-key license agreement that does not permit us to expose raw data.

We'll update soon in a point release. in the meantime, we recommend patching these in low universe numbers to allow SACN or artnet to be granted parameters on these universes.

</details>

<details>

<summary><strong>Some fixtures do not have focus enabled.</strong></summary>

Please send a [support ticket](https://support.carbonforunreal.com/knowledgebase/kb-tickets/new?hsLang=en) to our support team and we will address any library issues encountered.

</details>

<details>

<summary><strong>Edits done to fixtures in play mode do not save once you exit</strong></summary>

To save edits, select the fixtures or objects that you made a change to while in play mode, and right click, keep simulation changes

</details>

<details>

<summary><strong>Issues with sequencer tracks/ Crashing on sequencer recording</strong></summary>

* Make sure level has world partition disabled
  * If enabled, create a new blank level (not open world)
* Make sure that fixture names do not have special characters (\*, %, #)
* Ensure that all fixtures are uniquely named

</details>

<details>

<summary><strong>DMX Data is paused when trying to record using Sequencer</strong></summary>

To ensure proper functionality, DMX recording must always be done in Play mode. Remember to switch recording modes only when Play mode is stopped.

</details>


# Library Requests

Customers with Indie Edition licenses or greater may make requests for new fixtures, modes, and other assets.

We strive to build every fixture and asset needed for live events. If we are missing something, you may request it using the form below. Please fill our ONE form for each asset so we can better track our progress and notify you of completion

[Library Request Form](https://forms.clickup.com/2225479/f/23xa7-8354/N96PV869YL35JRO6FX)